 |
| How to customize and select applications for your MS Office (Microsoft 365) installation |
Introduction
With the ever-evolving landscape of digital productivity, MS Office (Microsoft 365) offers a flexible suite of applications tailored to meet diverse needs. Whether you require powerful tools for document creation, data analysis, or collaborative presentations, MS Office (Microsoft 365) allows users to customize their installations to suit individual preferences and workflows. In this post, we will guide you through the process of selecting and customizing applications within your Microsoft 365 setup. Without further ado, let's get started!
A little recap
To install
Microsoft Office, we need to download and run the Office Deployment Tool. Make sure to check our post on how to install Office for more details.
Step-by-step approach to customizing MS Office (Microsoft 365)
If you
don’t want to install all the applications that come with Office, so for
example you only want to install Word and Excel and PowerPoint and you don’t
want to install Publisher, then you need to customize your MS Office (Microsoft 365) installation.
To customize the installation, we use the Office Customization Tool as detailed in the following steps:
Generate a custom configuration file for MS Office (Microsoft 365) installation
As mentioned in our post concerning the installation of MS Office (Microsoft 365), once run, the Office Deployment Tool will extract several files where one of them is the installer while the rest are the configuration files for the installation process. To customize our MS Office (Microsoft 365) installation, we need to generate our own configuration file. We do so by searching for Office Customization Tool on our favorite search engine, and then visiting the webpage and select our desired options and finally exporting the configuration file.
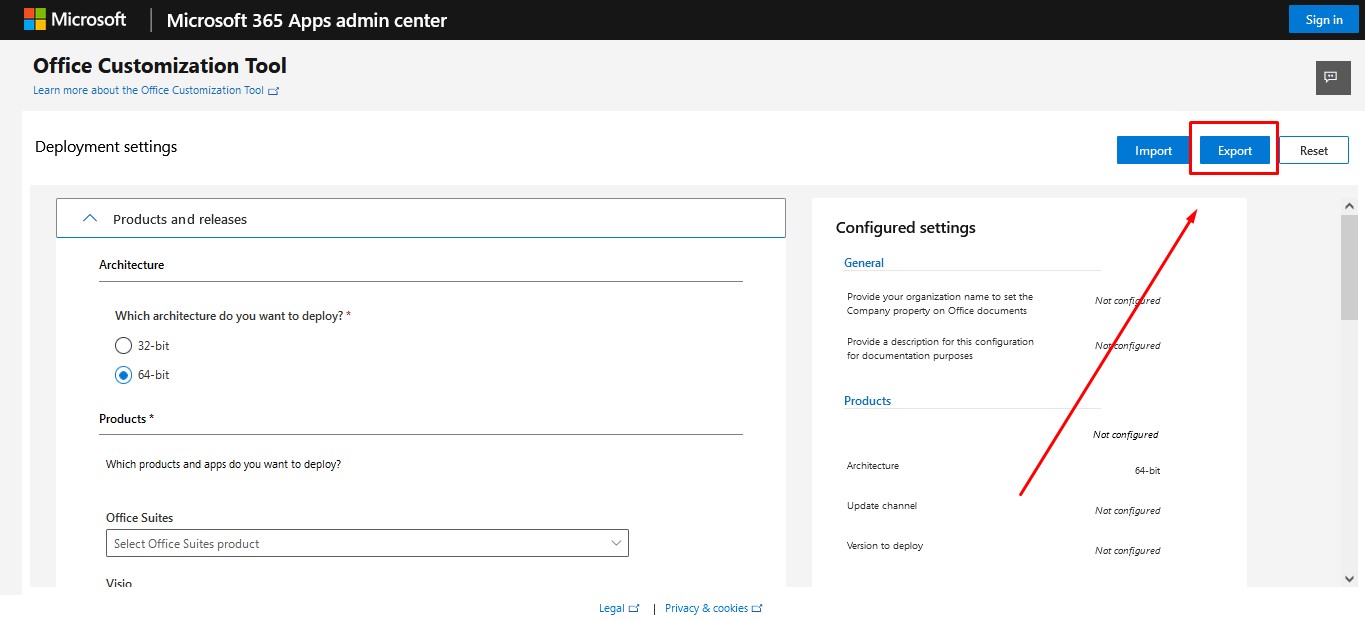 |
| Exporting the configuration file |
Install Microsoft Office (Microsoft 365) using the downloaded configuration file
The exported file in the previous step is an XML configuration file that will be used to install Office as we have shown in our post concerning the installation of Microsoft Office (Microsoft 365). Just a quick recap: To install Office, we extract the Office Deployment Tool
that we have installed. Next, we copy the extracted files and the downloaded
XML configuration file to a new folder. We open PowerShell and type .\setup.exe
/configure
followed by the name of our downloaded XML file and click Enter to run. Finally, we wait for the
installation process to finish.
 |
| Complete PowerShell Command |
Microsoft Office (Microsoft 365) installation customization options
Office Customization Tool offers several options to customize our Microsoft Office (Microsoft 365) installation. Let's break down these different options:
In the Products and Releases section, we first select which
architecture our device has. It is worth nothing that most modern computers are built on 64-bit architecture and our device is likely to be so; however, make sure to double check which architecture our computer has.
 |
| Selecting the architecture |
Under the Products subsection, we select which products and apps to deploy.
Under Office Suites subsection, we select
which Office Suit we would like to install. To know more, check the different Office Suites that Microsoft offers.
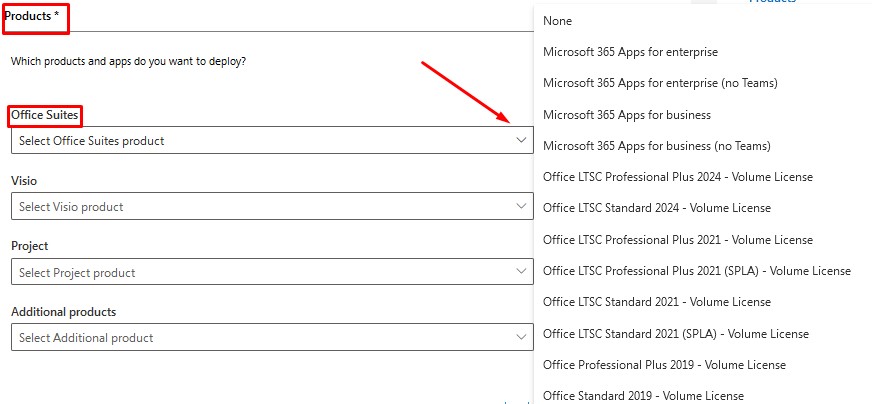 |
Office Suites to select from
|
Under the
Visio subsection, we select whether we want to install Visio or not.
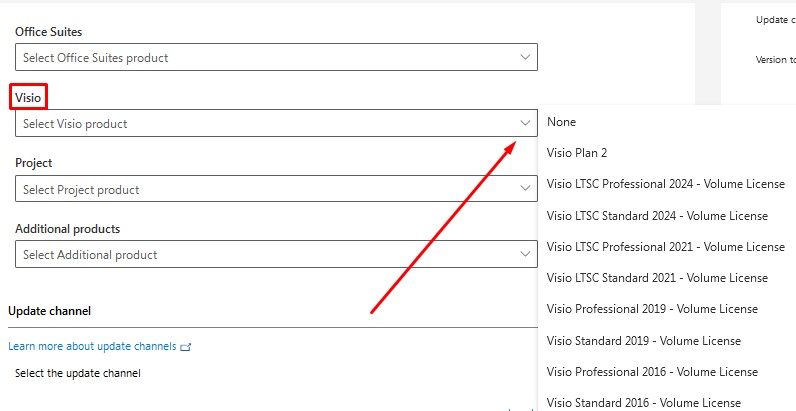 |
Selecting Visio
|
Under the
Project subsection, we select whether we want to install Microsoft Project or not.
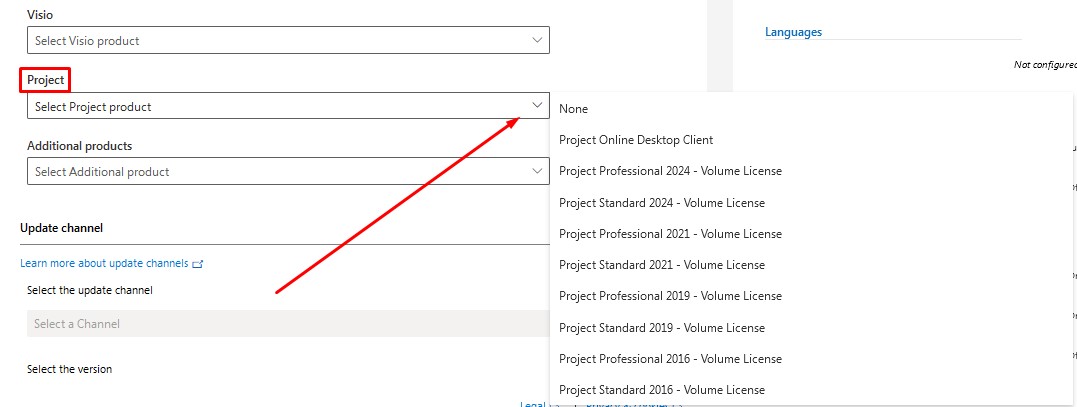 |
Selecting MS Project
|
Note: Visio and Microsoft Project are not included in Office Suites but are sold as
separate products, that’s why we should select them separately.
Under the Additional Products subsection, we select whether we want to install Language packs, Office 365 Access Runtime and Skype for Business or not. Language Packs include
additional display, help, and proofing tools, while Office 365 Access Runtime
is a free and simplified version of Microsoft Access enabling users to run
Access databases without the need to buy it. Skype for Business is an enterprise software application for instant messaging and video-telephony.
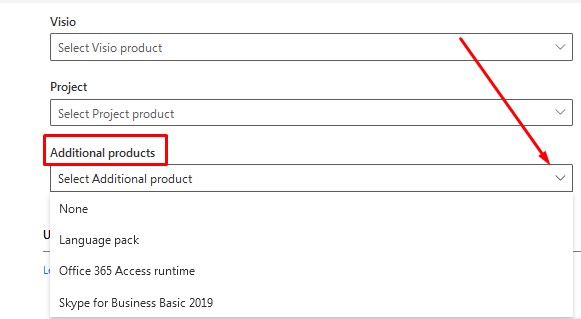 |
Selecting Additional Products
|
When it comes to the
Update
Channel subsection, it is recommended to keep the default selection.
 |
| Update
Channel subsection |
This
section sets up the way updates are delivered. Selecting Current Channel means
that we receive the latest updates and often within a month of release.
Selecting Monthly Enterprise Channel means
that updates are delivered monthly and have undergone more testing than the
Current Channel. Selecting Semi-Annual Enterprise Channel means that updates
are delivered twice a year.
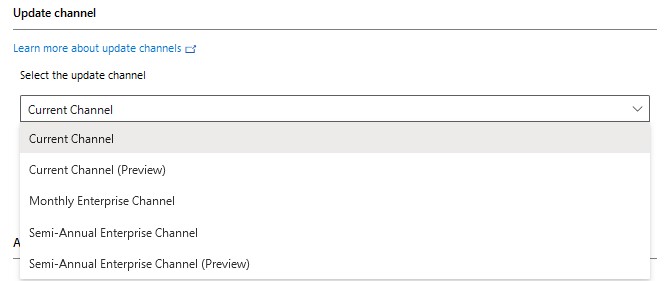 |
| Update Channel options |
Under the
Apps subsection, we select which applications we would
like to install.
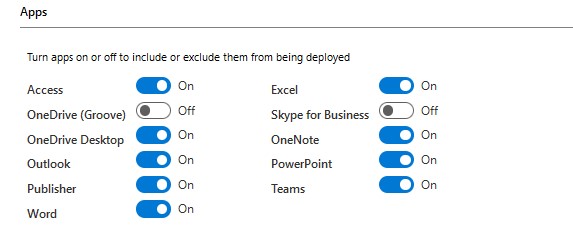 |
| Apps subsection |
When it comes to
Features subsection, the option to have a Background
service for Microsoft Search in Bing means that it will be easier to retrieve
info using office applications by searching Bing.
 |
| Features subsection |
In the Language section, we select which languages to be
included in our Office installation.
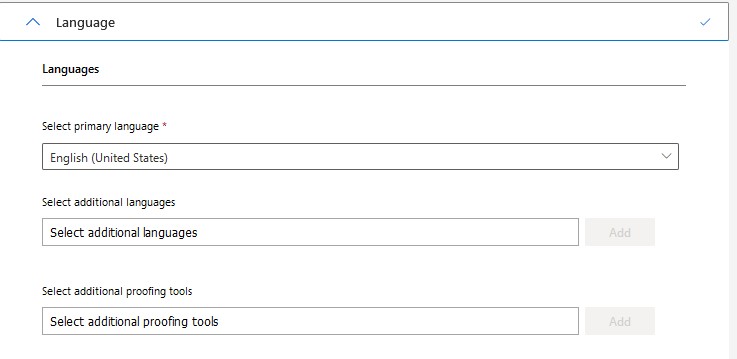 |
| Language section |
In the Installation section, we get to choose whether to
download the required files from a Content Delivery Network CDN or whether the
files already exist on a local source and whether the user sees the
installation process or not and whether the installation process shuts down other
applications running on our computer. It is recommended to keep the default
selection.
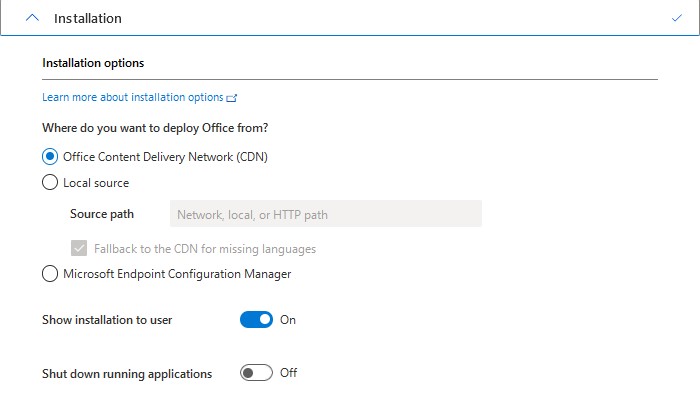 |
| Installation section |
The Update and Upgrade section allows us to select whether
we want to uninstall existing applications once we upgrade our products, and
whether languages selected in the Language section should also be installed for
existing applications, and whether applications should automatically upgrade to
the architecture selected in the Architecture subsection.
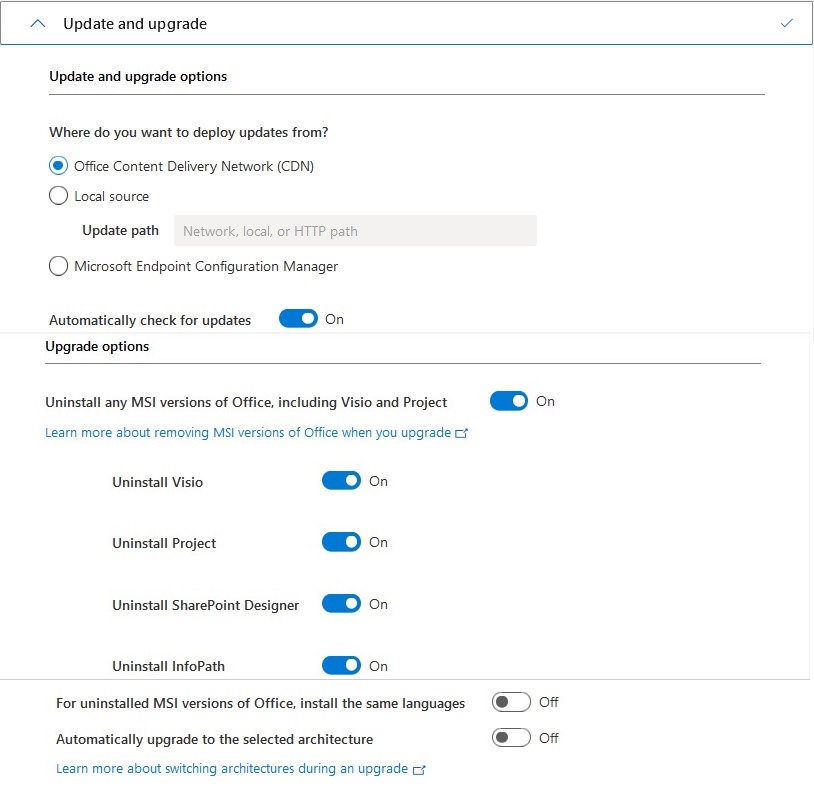 |
| Update and Upgrade section |
The Licensing and Activation section allows us to set up
which licensing method we prefer. For product keys, we can choose KMS which
means Key Management Service or MAK which means Multiple Activation Key. The
difference between the two is that KMS allows organizations to activate systems
within their own network while MAK activates systems on a one-time basis, using
Microsoft hosted activation services. Selecting KMS is often preferred. We can
also select the licensing mode under Product Activation. In User Based mode, the license is carried
within the user’s profile. In Shared Computer mode, Microsoft 365 is installed
on a single computer shared by multiple users and each user signs in with their
own account. The Device Based mode is aimed to help enterprises managing having
Microsoft 365 on devices shared by many users. In this case, User level
activation and Microsoft Entra accounts which are used for identity and access
management are not needed. Most users will opt for the User Based mode. This
section also allows us to select whether the license terms are automatically
accepted or not.
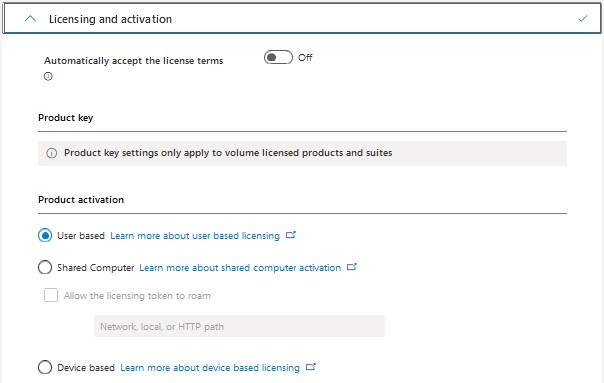 |
| Licensing and Activation |
The General section allows us to add the name of our
organization so that it is added to every document we create with Office. It
is recommended not to input anything in this section.
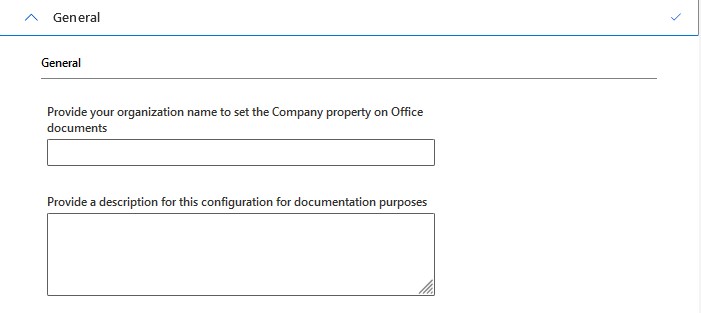 |
| General section |
The Application Preferences section is used for more
advanced customization of the applications, and it is recommended not to change
anything here unless it is required from us by our organization.
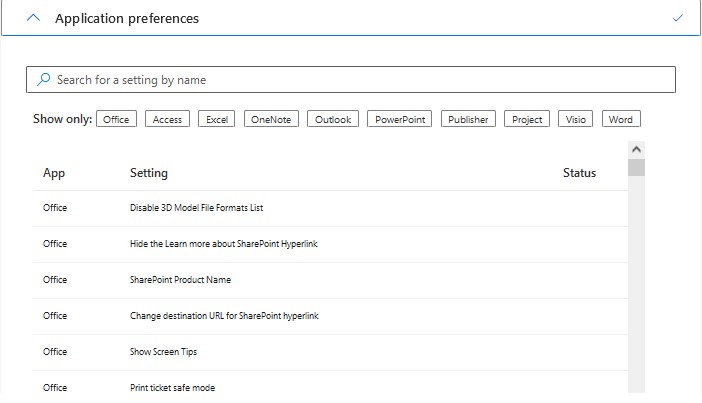 |
| Application Preferences section |
Conclusion
In conclusion, customizing our Microsoft 365 installation is a powerful way to enhance our productivity and ensure that we have the right tools at our fingertips. As we've explored, the customization process is straightforward, allowing us to configure settings and features that suit our workflow. Don’t forget to explore other blog posts for more
tutorials and insights to help you make the most of Microsoft Office’s
features. Until next time!


