 |
| Exploring Microsoft Word interface |
Introduction
Microsoft Word provides all the tools we need to craft polished documents with ease. But with its extensive features and countless options, navigating Word’s interface can be overwhelming for new users. In this blog post, we’ll take a closer look at the layout and key elements of Microsoft Word’s interface. Whether you're just starting or want to sharpen your skills, this guide will help you feel more confident in navigating Word’s powerful features. Let’s dive in!
The Start Screen
When we first open Microsoft Word, we are greeted by the Start Screen. Here, we can choose to create a new document or open an existing one.
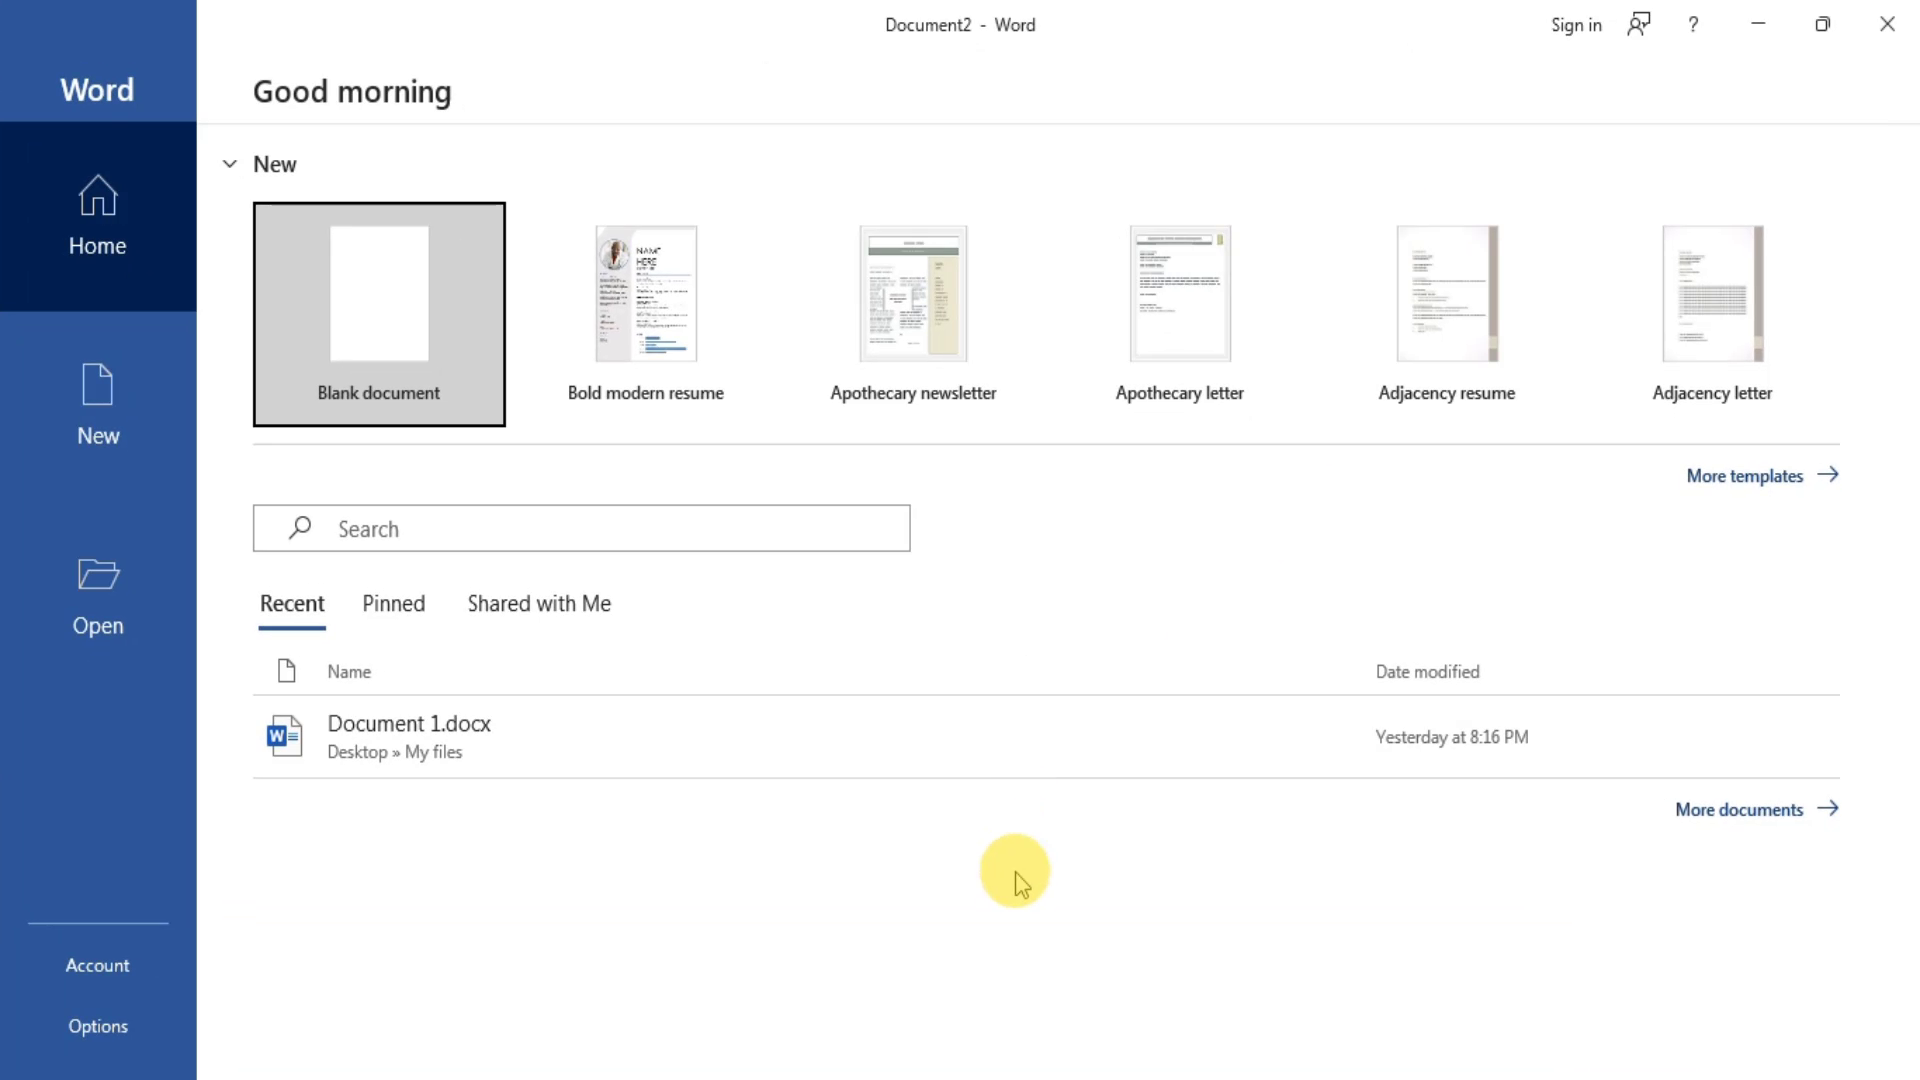 |
| The Start Screen |
Clicking
New in the
Start Screen gives us access to various templates, from resumes to flyers. If we want to start fresh, we just click
Blank Document (This button is also available in the
Home section of the
Start Screen).
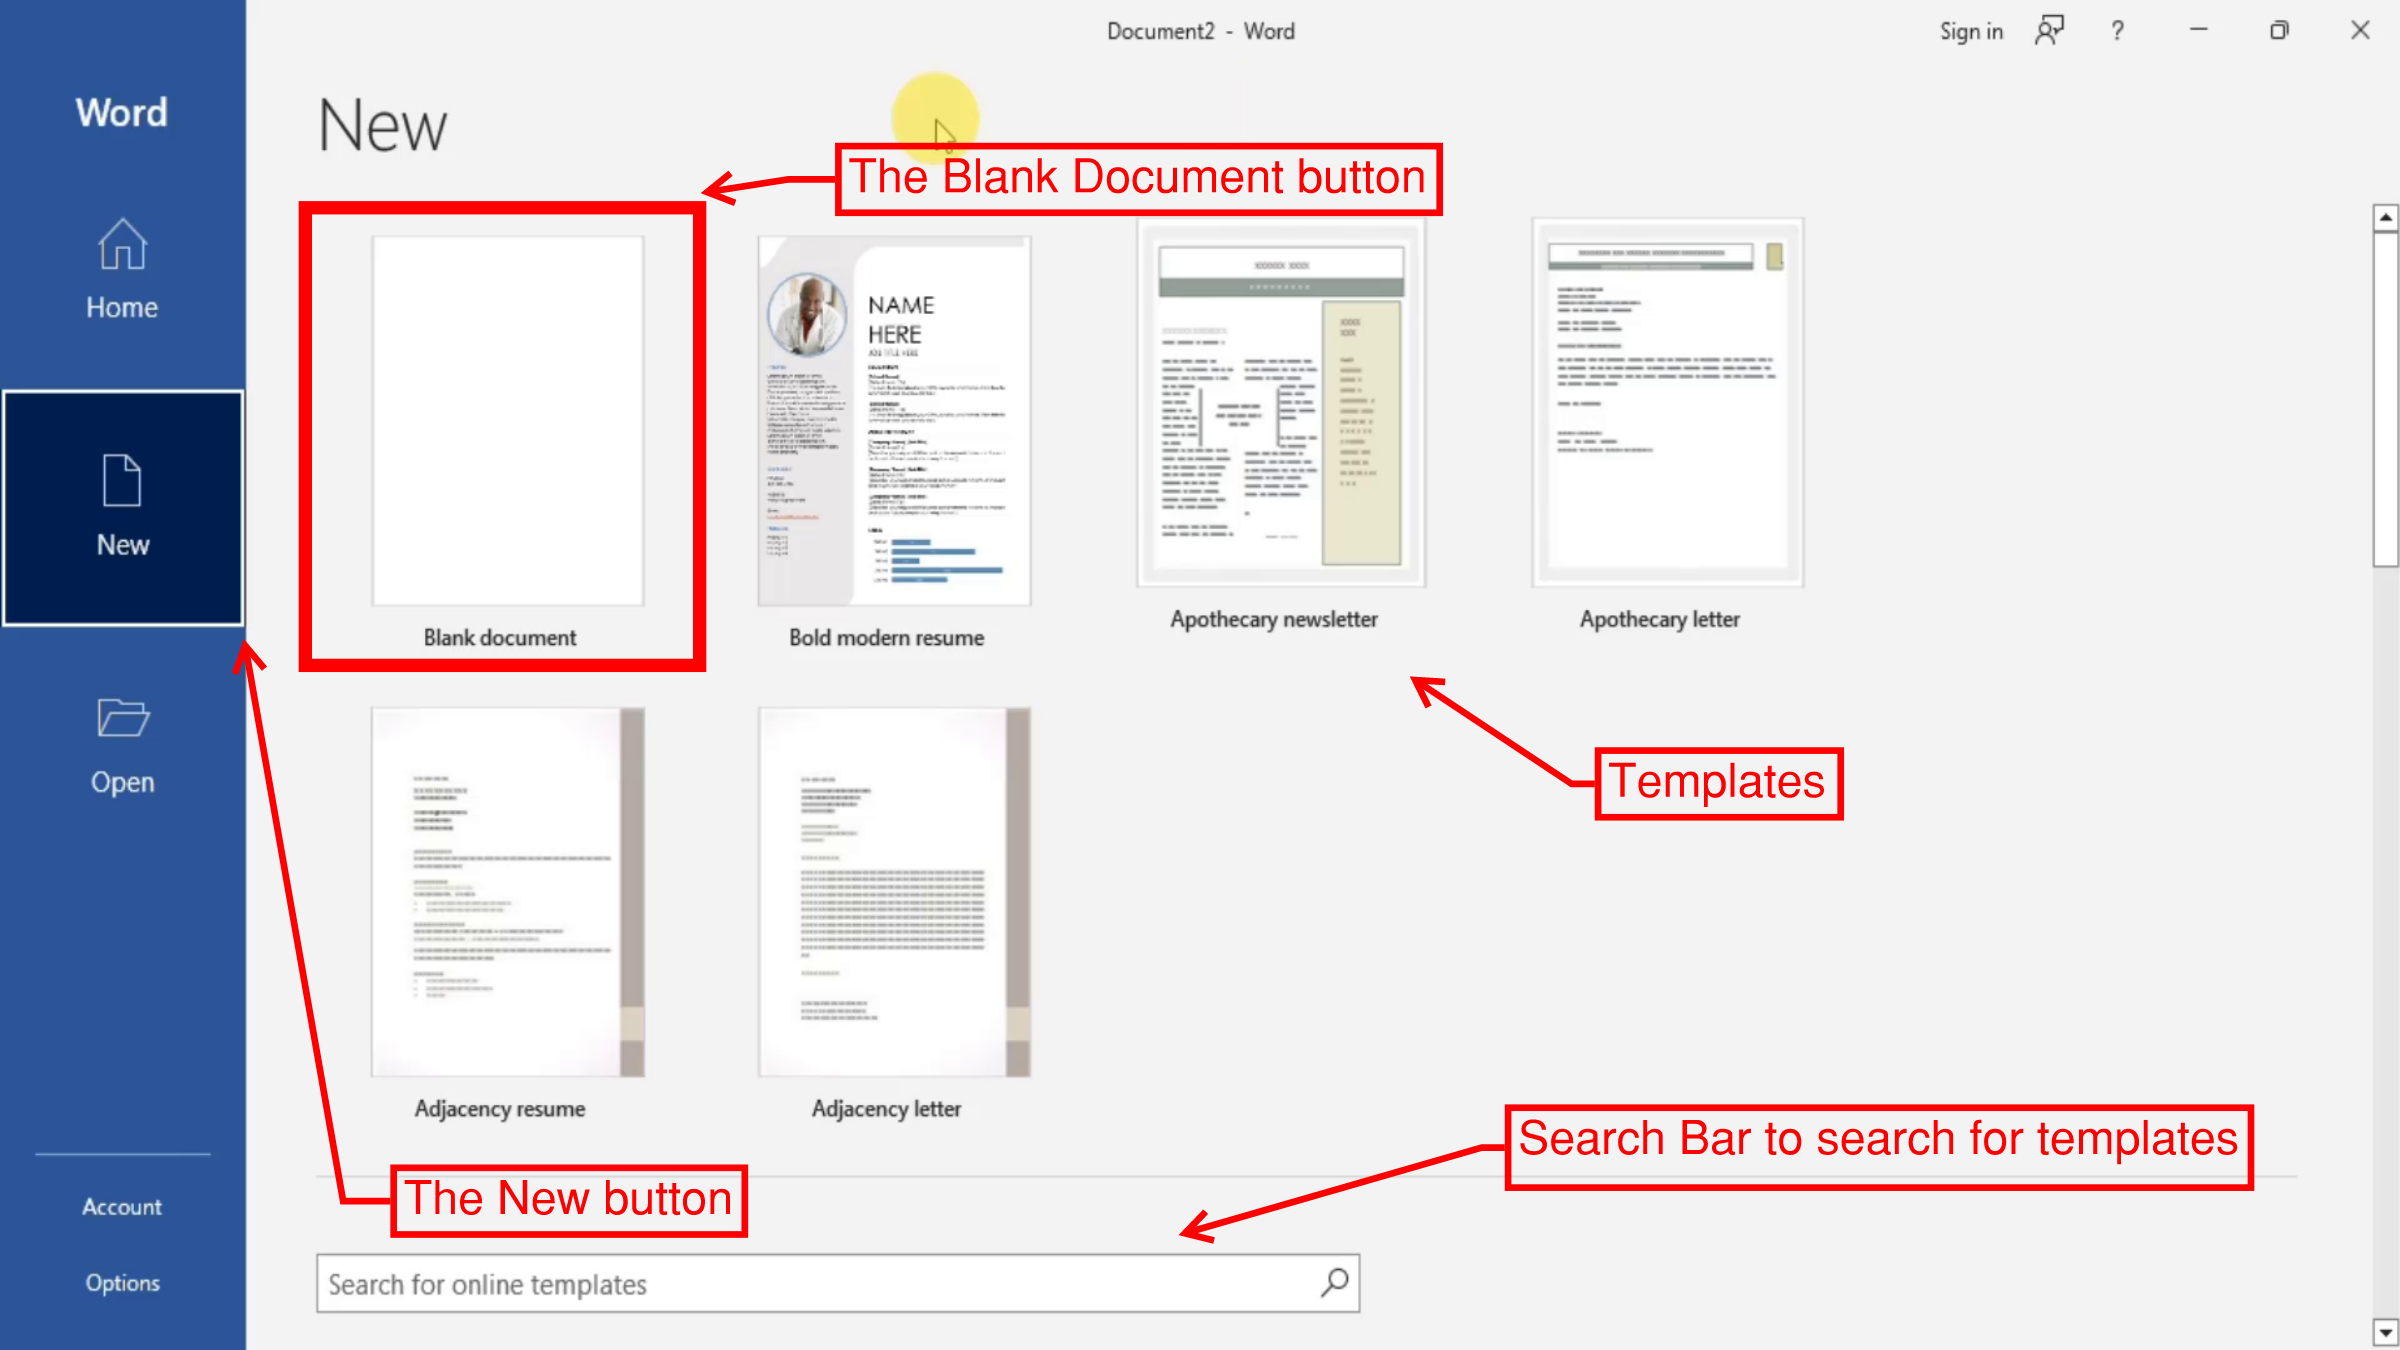 |
| The New Section |
Clicking
Open in the
Start Screen lets us access existing documents. Please check
our post about the Start Screen for more information.
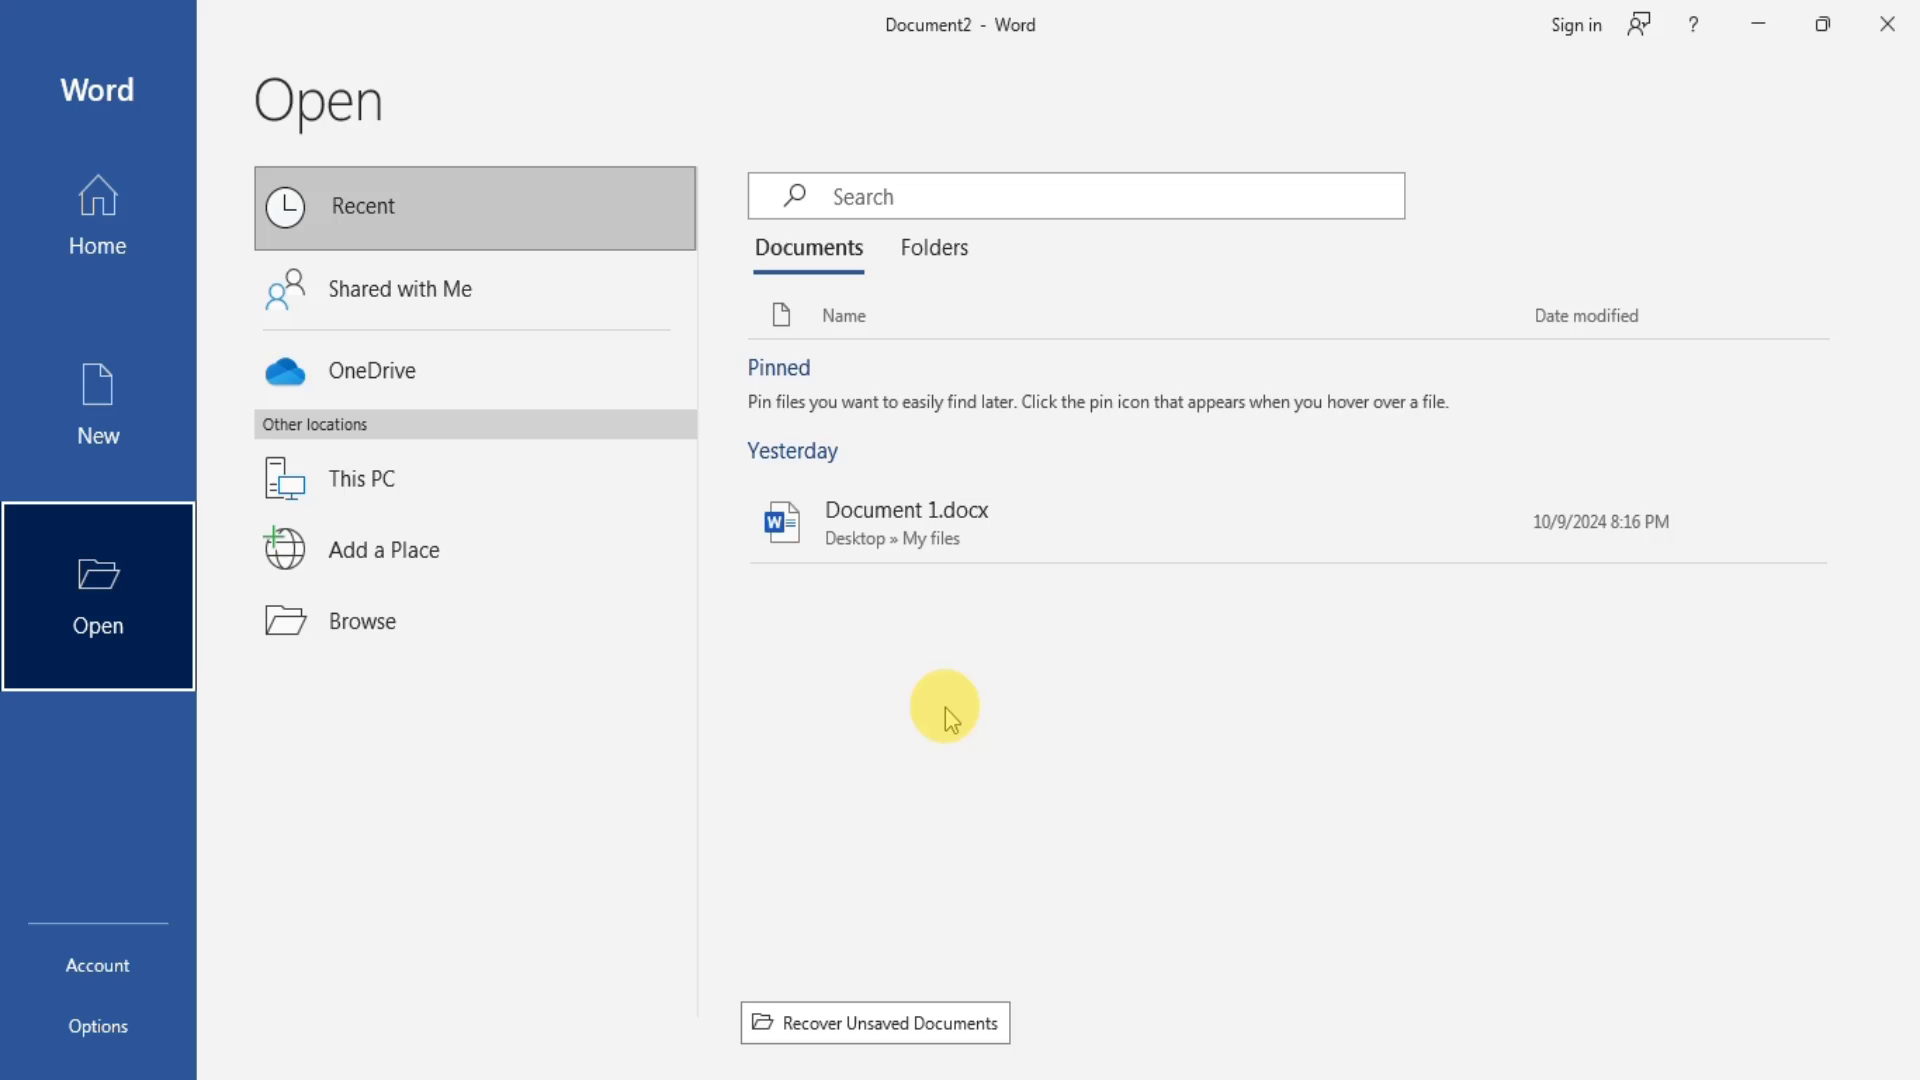 |
| The Open section |
The Document Interface
The Document Interface in Microsoft Word refers to the user interface layout that displays the active document within a window, allowing users to view, edit, and format text, as well as access various tools and features. This interface appears whenever a document is opened.
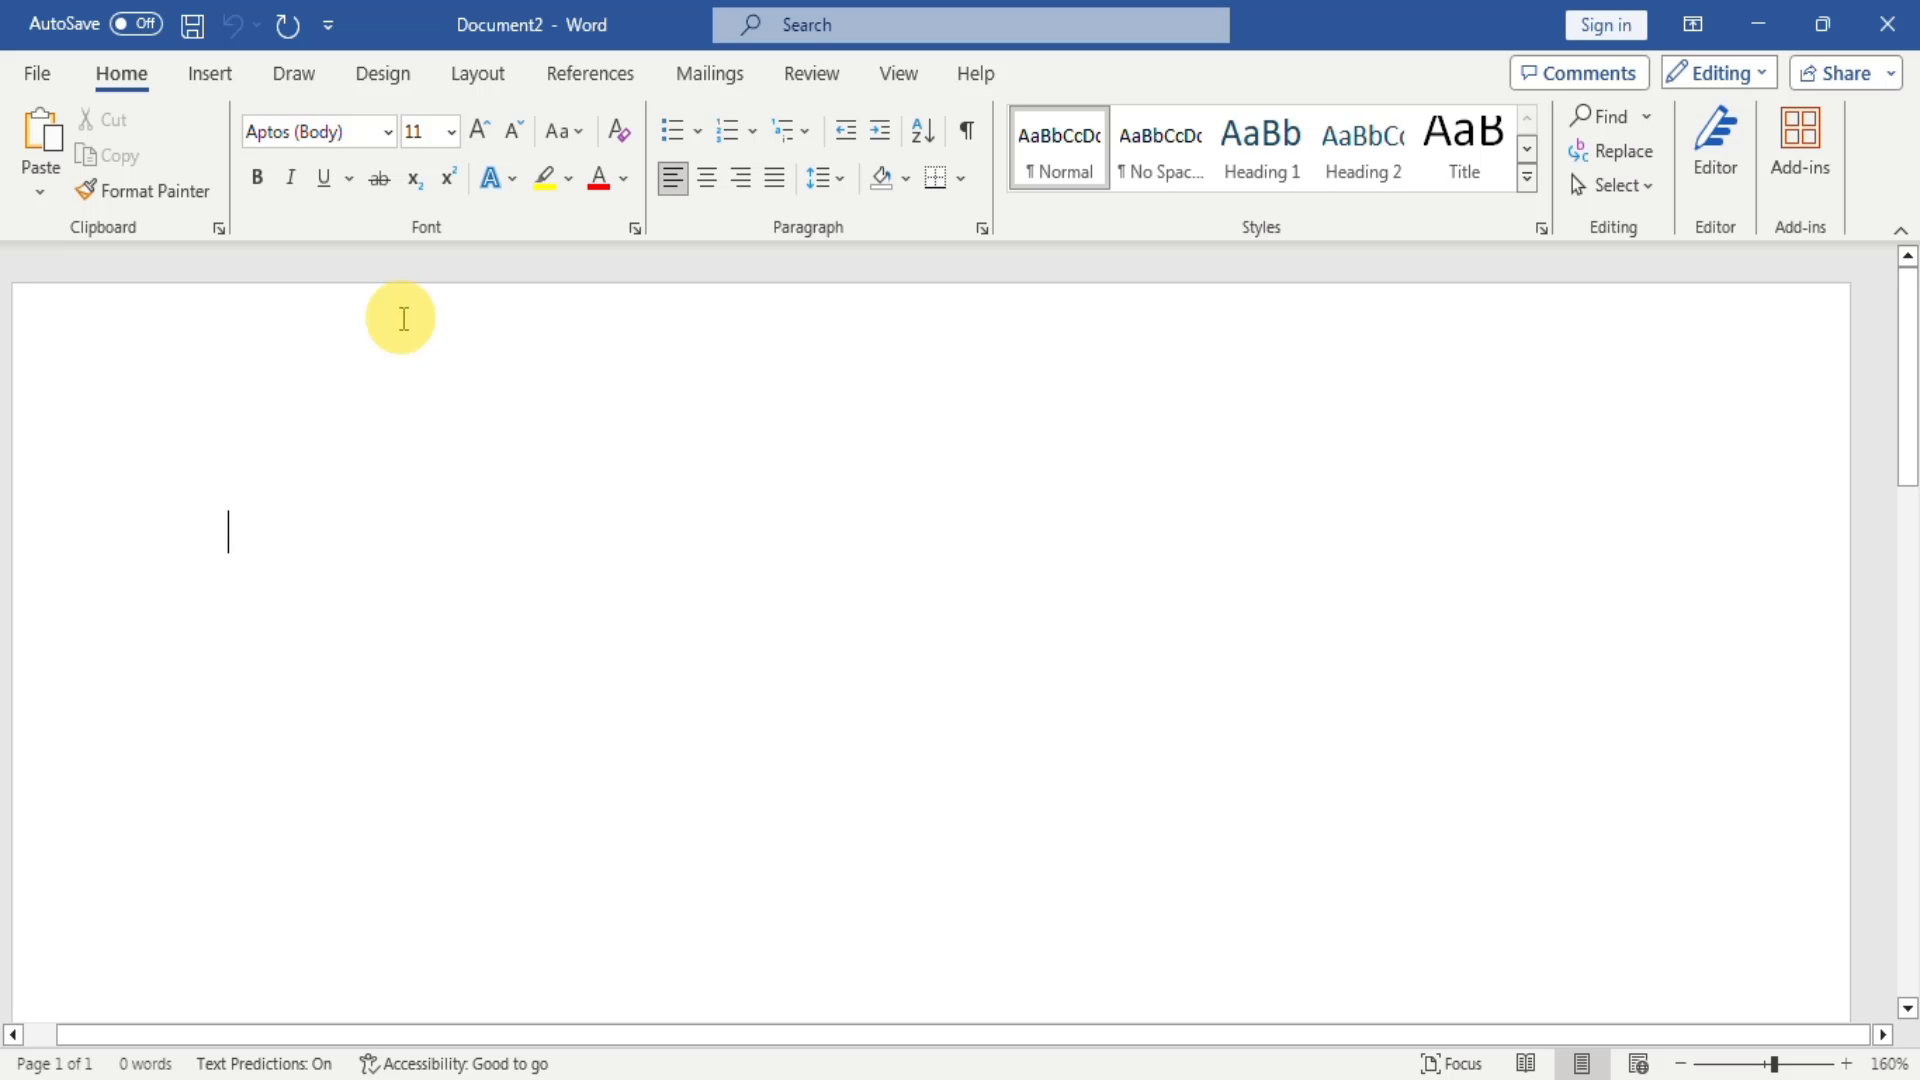 |
| The Document Interface |
Let’s start with a blank document and break down the Microsoft Word interface:
The Title Bar
The Quick Access Toolbar, located at the top-left corner of the screen is a customizable toolbar aimed at providing quick access to common commands such as save, undo, and redo. The Quick Access Toolbar is part of the Title Bar, which displays the name of the currently open document. The Title Bar also includes a Search Box that displays recent actions and suggests others based on our activity. Next to it is the Sign In button, which can be used to log in to our account. Next to the Sign In button we find the Ribbon Display Options button. Next to the Ribbon Display Options button, we find the standard Window Menu, which contains the Minimize button that temporarily hides the current Microsoft Word window, the Maximize or Restore button that expands the window to use all available screen space, and the Close button that closes the current Microsoft Word window.
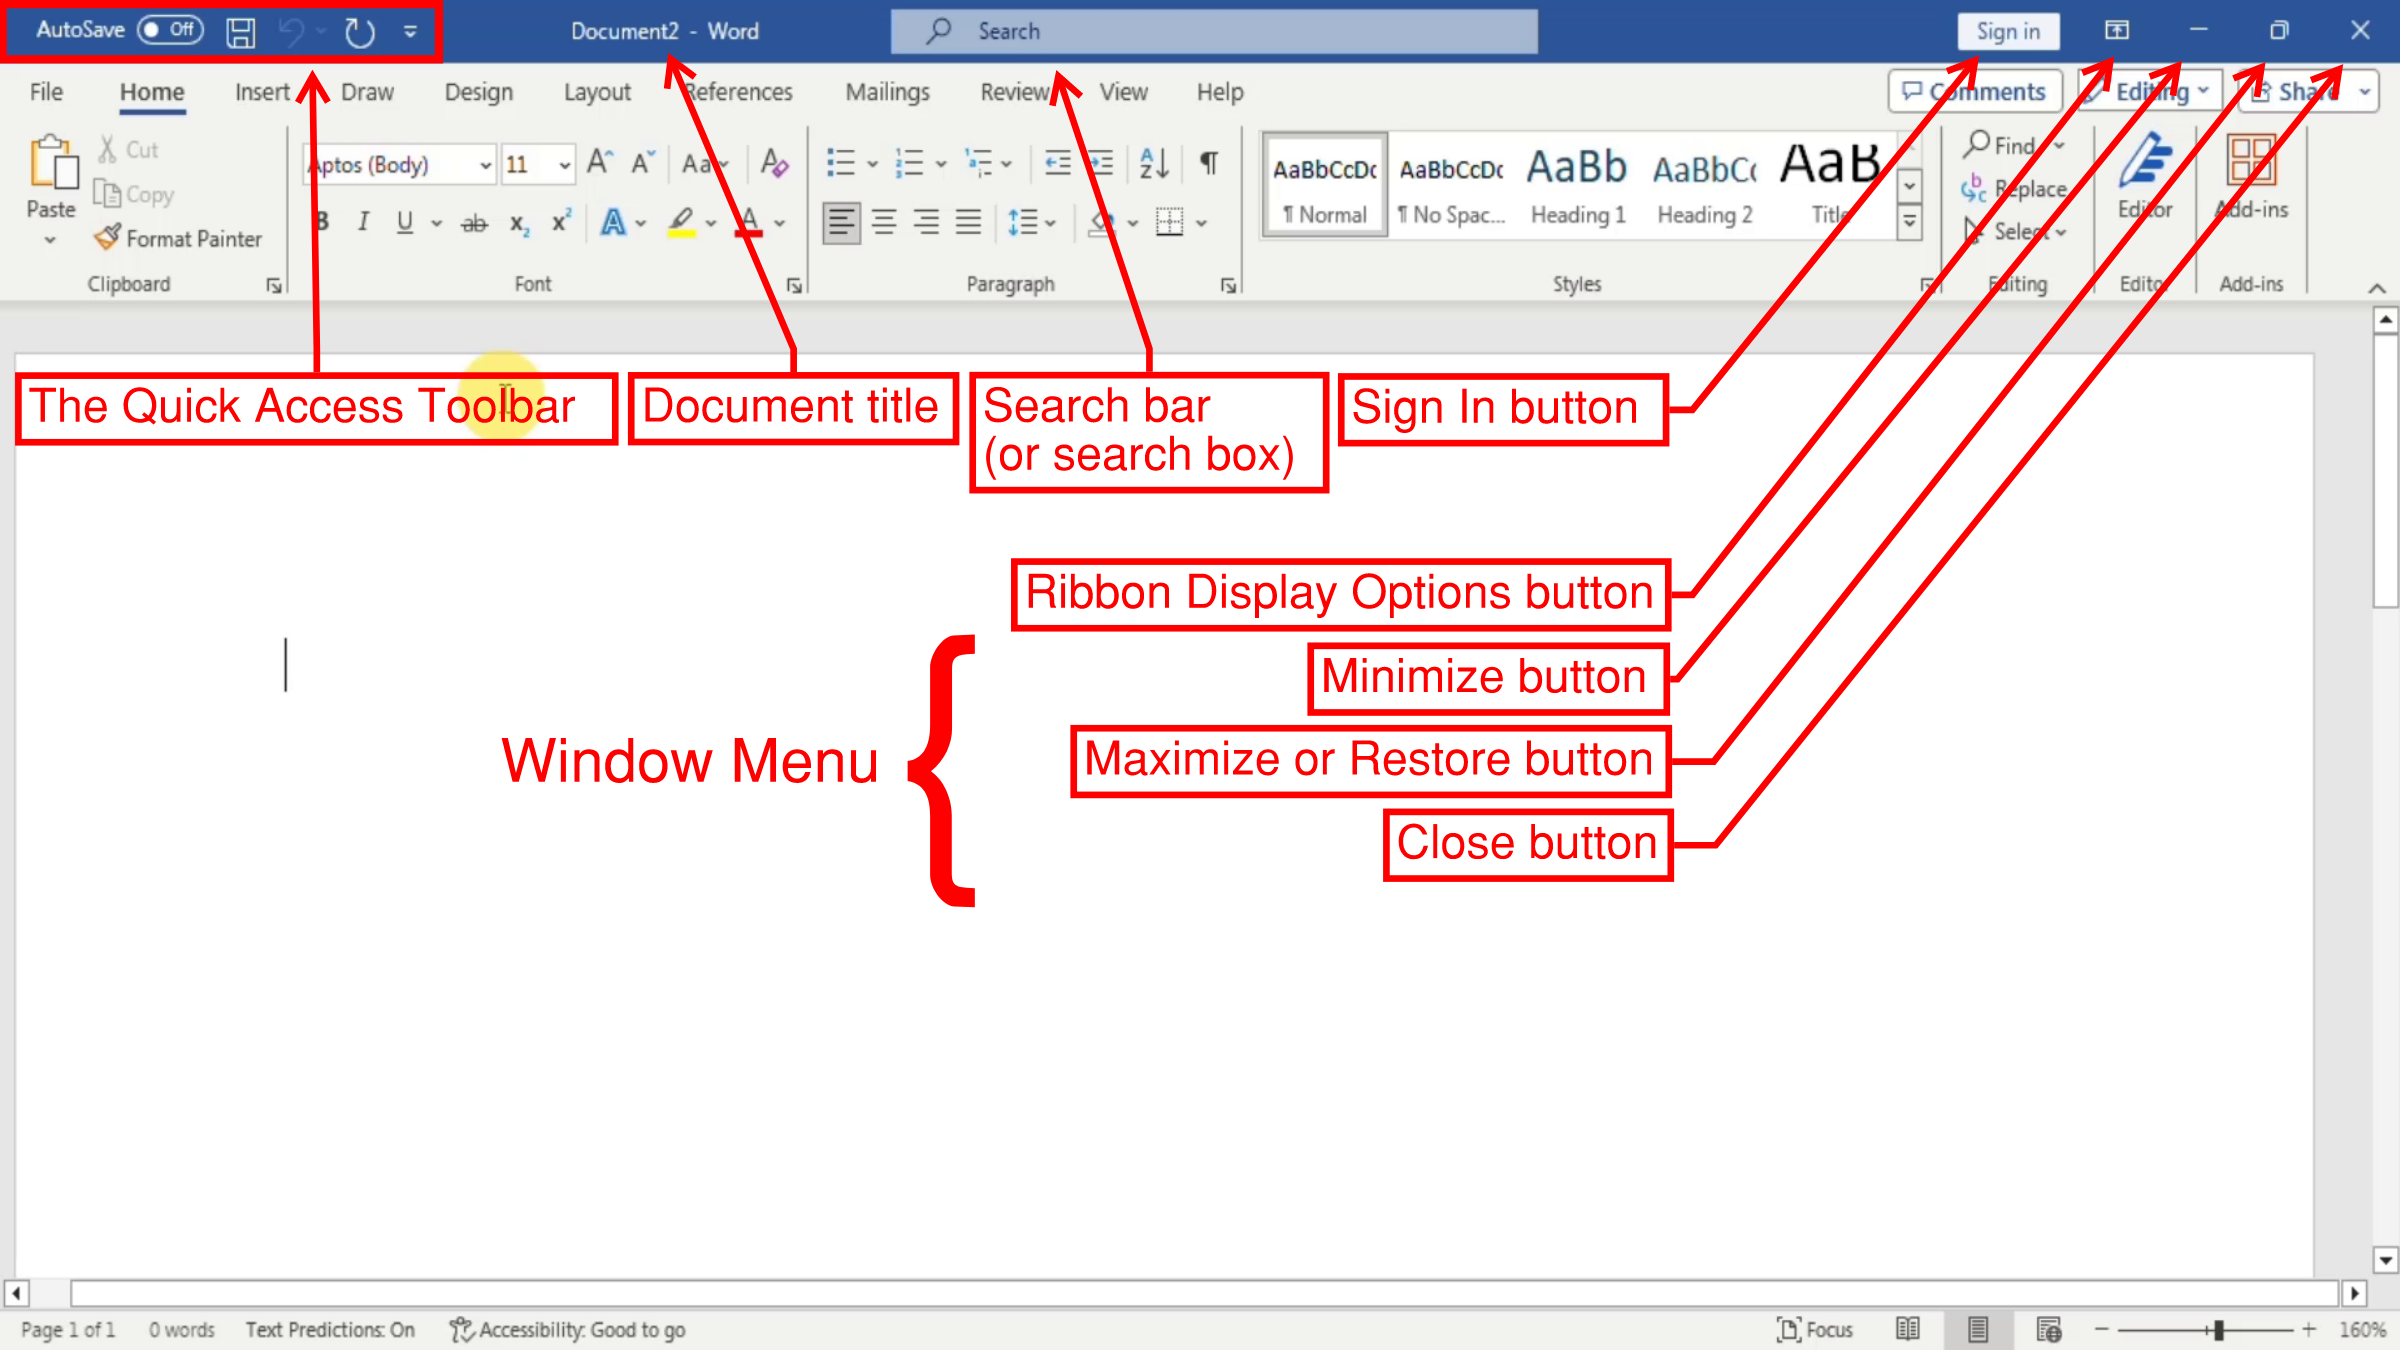 |
| The Title Bar |
The Ribbon
The Ribbon is divided into tabs, each containing groups of related commands.
 |
| The Ribbon |
Clicking on the File tab brings up the Backstage View of the document, which provides several commands, like creating, opening, saving, printing, and exporting documents, among others.
 |
| The Backstage View |
On the Home tab, we find the most used and essential commands.
 |
| The Home Tab |
The
Insert tab is used to add elements to our document.
 |
| The Insert Tab |
The
Draw tab offers several types of drawing commands.
 |
| The Draw Tab |
The
Design tab provides options for enhancing the overall look of our document with themes, colors, and fonts.
 |
| The Design Tab |
The
Layout tab helps us adjust the page setup, including margins, orientation, and spacing options.
 |
| The Layout Tab |
The
References tab is designed for managing citations, bibliographies, and adding footnotes or endnotes.
 |
| The References Tab |
The
Mailings tab provides tools for creating and managing mass mailings, including labels and envelopes.
 |
| The Mailings Tab |
The
Review tab is used to check grammar and spelling, add comments, and track changes during collaboration.
 |
| The Review Tab |
The
View tab allows us to change how we see our document, including different layouts, zoom levels, and navigation options.
 |
| The View Tab |
The
Help tab offers resources and guidance, including tutorials, tips, and access to the Microsoft support community, making it easier for users to find solutions to their questions.
 |
| The Help Tab |
Each tab includes Command Groups composed of individual commands. Some groups also have a small arrow in the bottom-right corner that we can click for even more options.
 |
| Command Group |
We have already mentioned the Ribbon Display Options which provide users with flexibility in managing the visibility of the Ribbon. Located at the top right corner of the Word interface, these options allow us to choose how the Ribbon is displayed: we can keep it fully expanded for easy access to all features by selecting Show Tabs and Commands, minimize it to save screen space while still showing tab names by selecting Show Tabs, or hide it completely by selecting Auto-hide Ribbon.
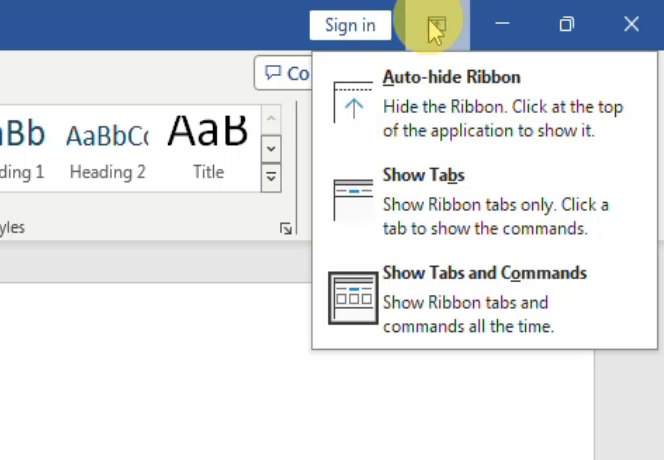 |
| Ribbon Display Options |
The Document Area
Underneath the Ribbon, we find the Document Area. It is the main workspace where users create and edit their text and other content. Clicking inside the Document Area brings up the Insertion Point represented by a blinking vertical line, which indicates where any new text or content will be added to our document. As we type, the insertion point moves forward, allowing us to see exactly where our text will appear. We can easily reposition the insertion point by clicking with our mouse or using the arrow keys on our keyboard, making it simple to edit or insert content at any location. Users can navigate through the Document Area using scroll bars.
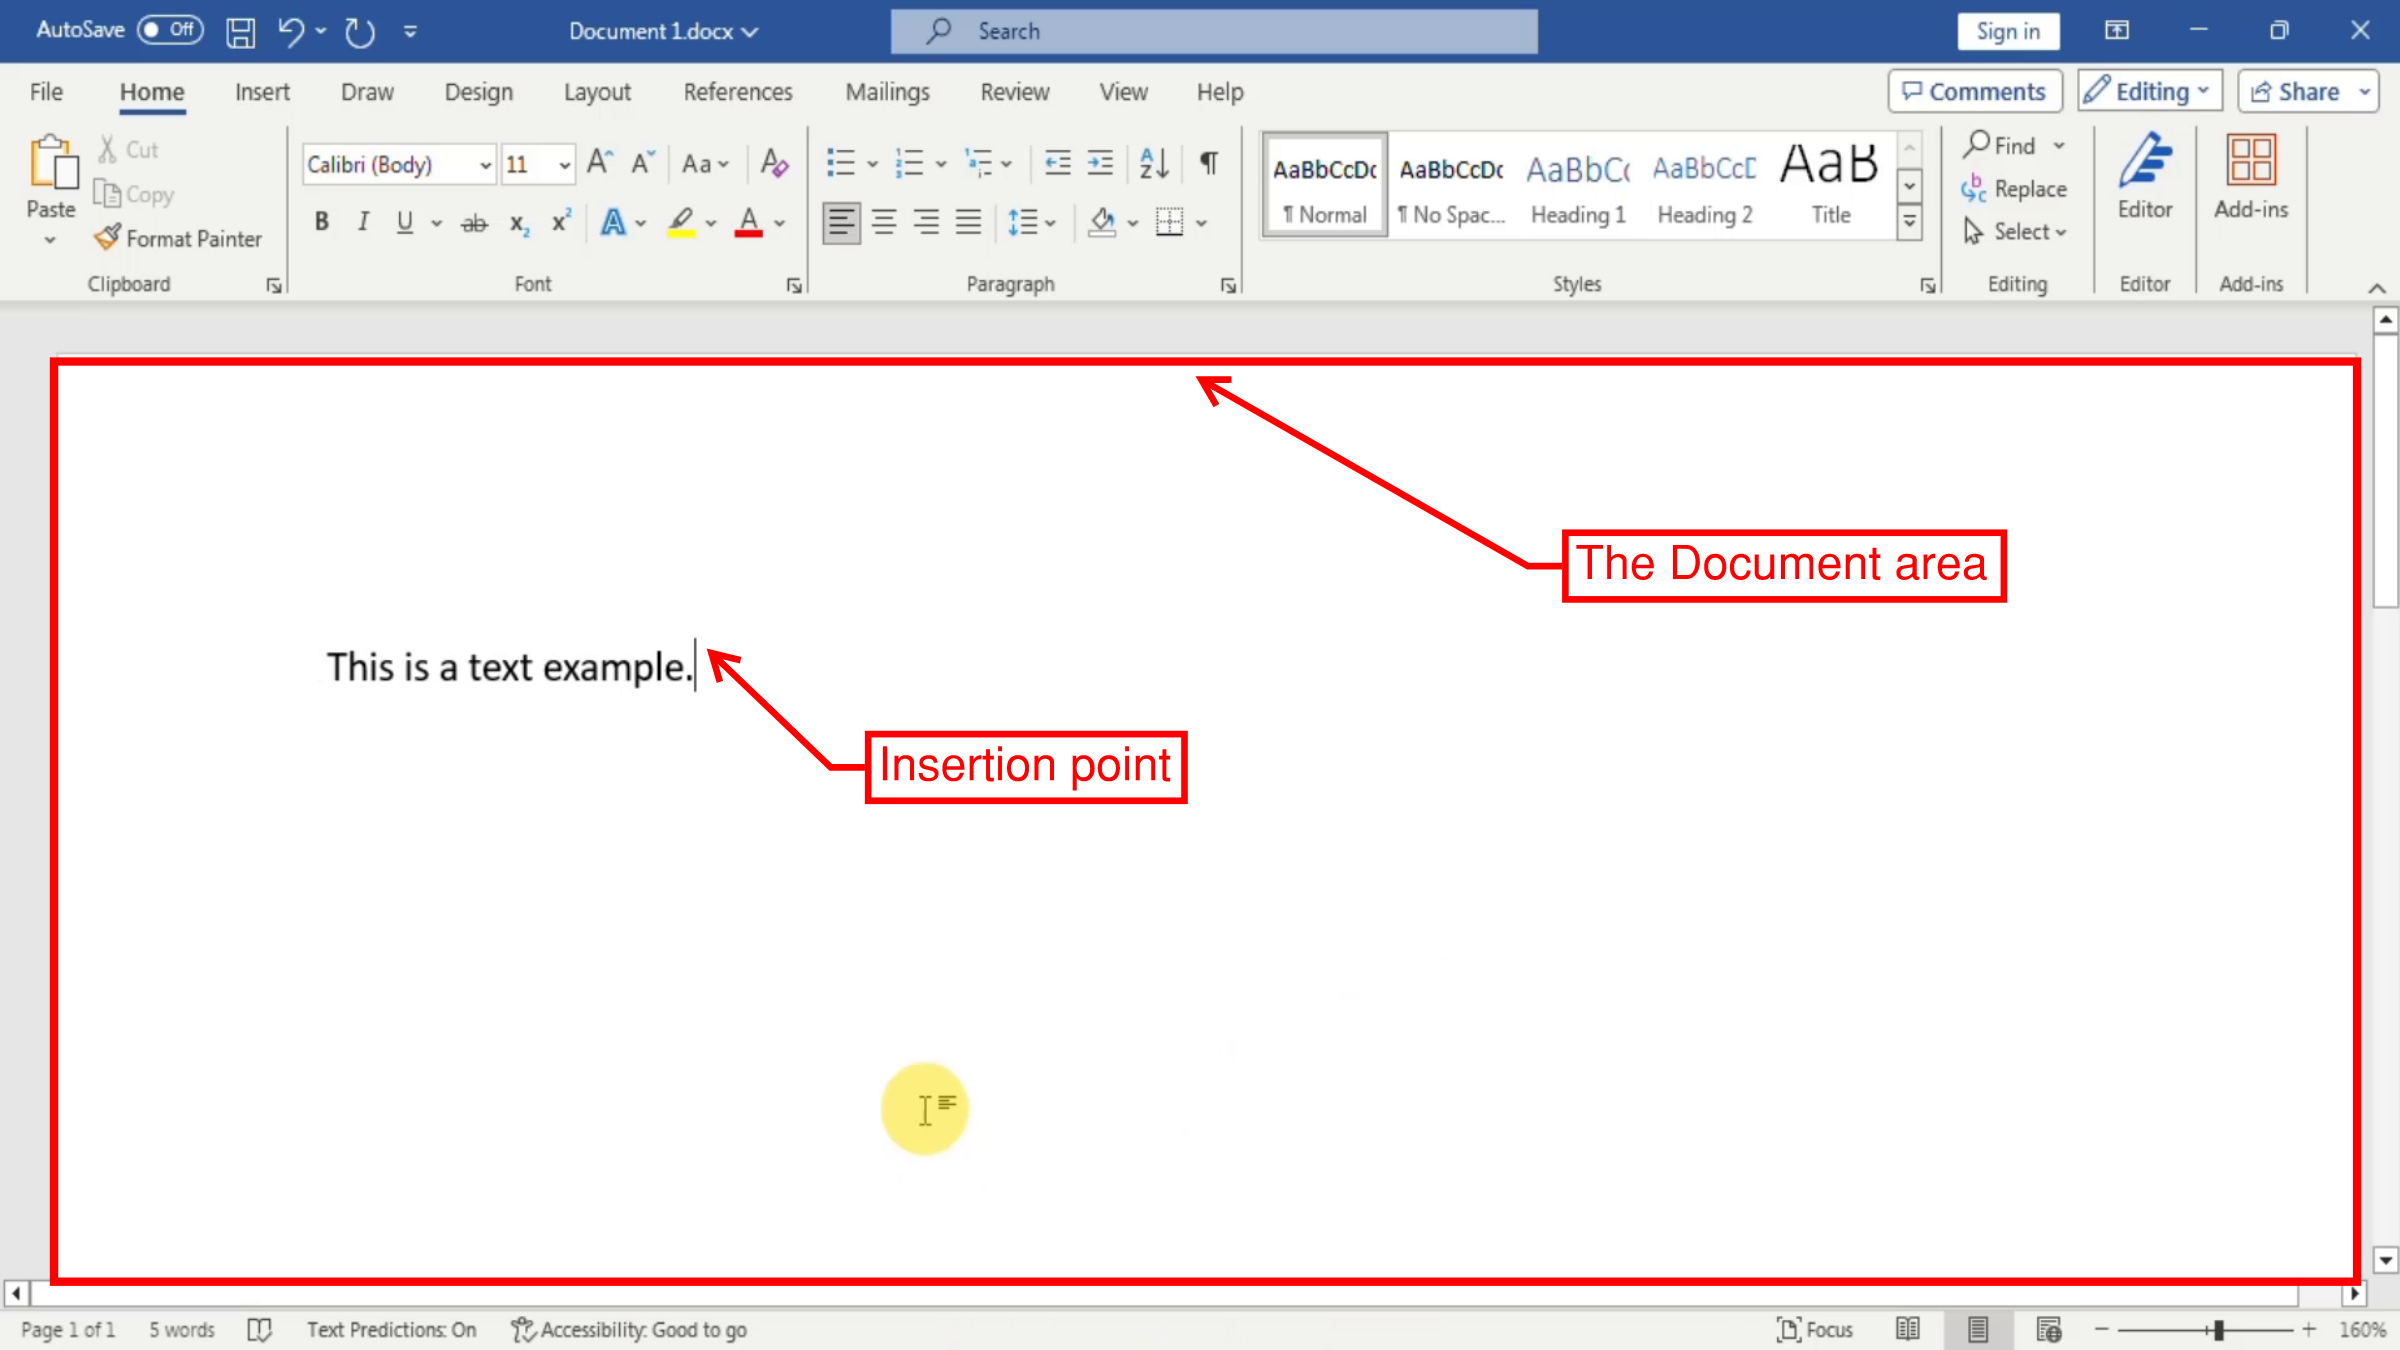 |
| The Document Area |
Additionally, various formatting options, such as font styles, sizes, and colors, can be applied directly within this area as we type.
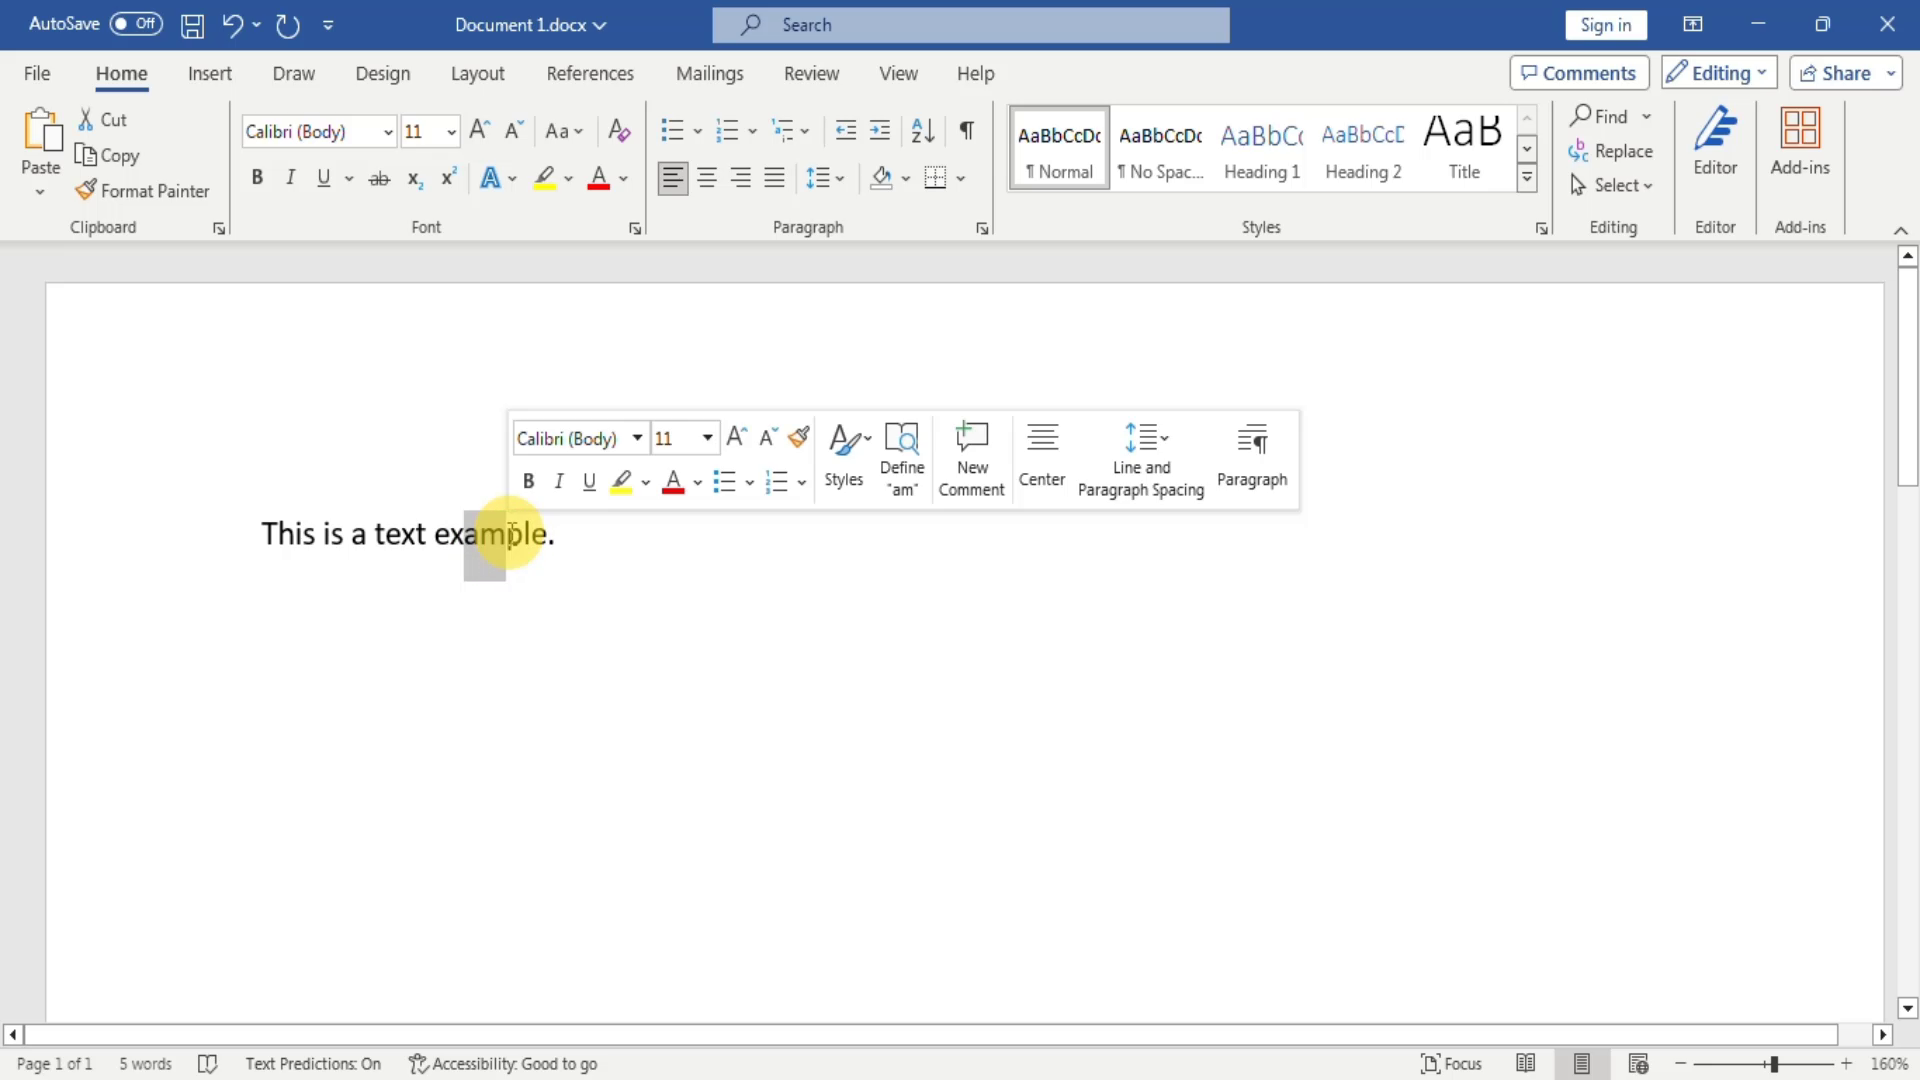 |
| Formatting in the Document Area |
The Ruler
Surrounding the Document Area is the Ruler. The Ruler in Microsoft Word is a versatile tool that appears at the top and left side of the document window, providing users with precise control over the layout and formatting of their text. The Horizontal Ruler allows us to set margins, indent paragraphs, and control tab stops, enabling a polished presentation of content. Meanwhile, the Vertical Ruler offers a visual guide for adjusting the vertical alignment and positioning of elements on the page.
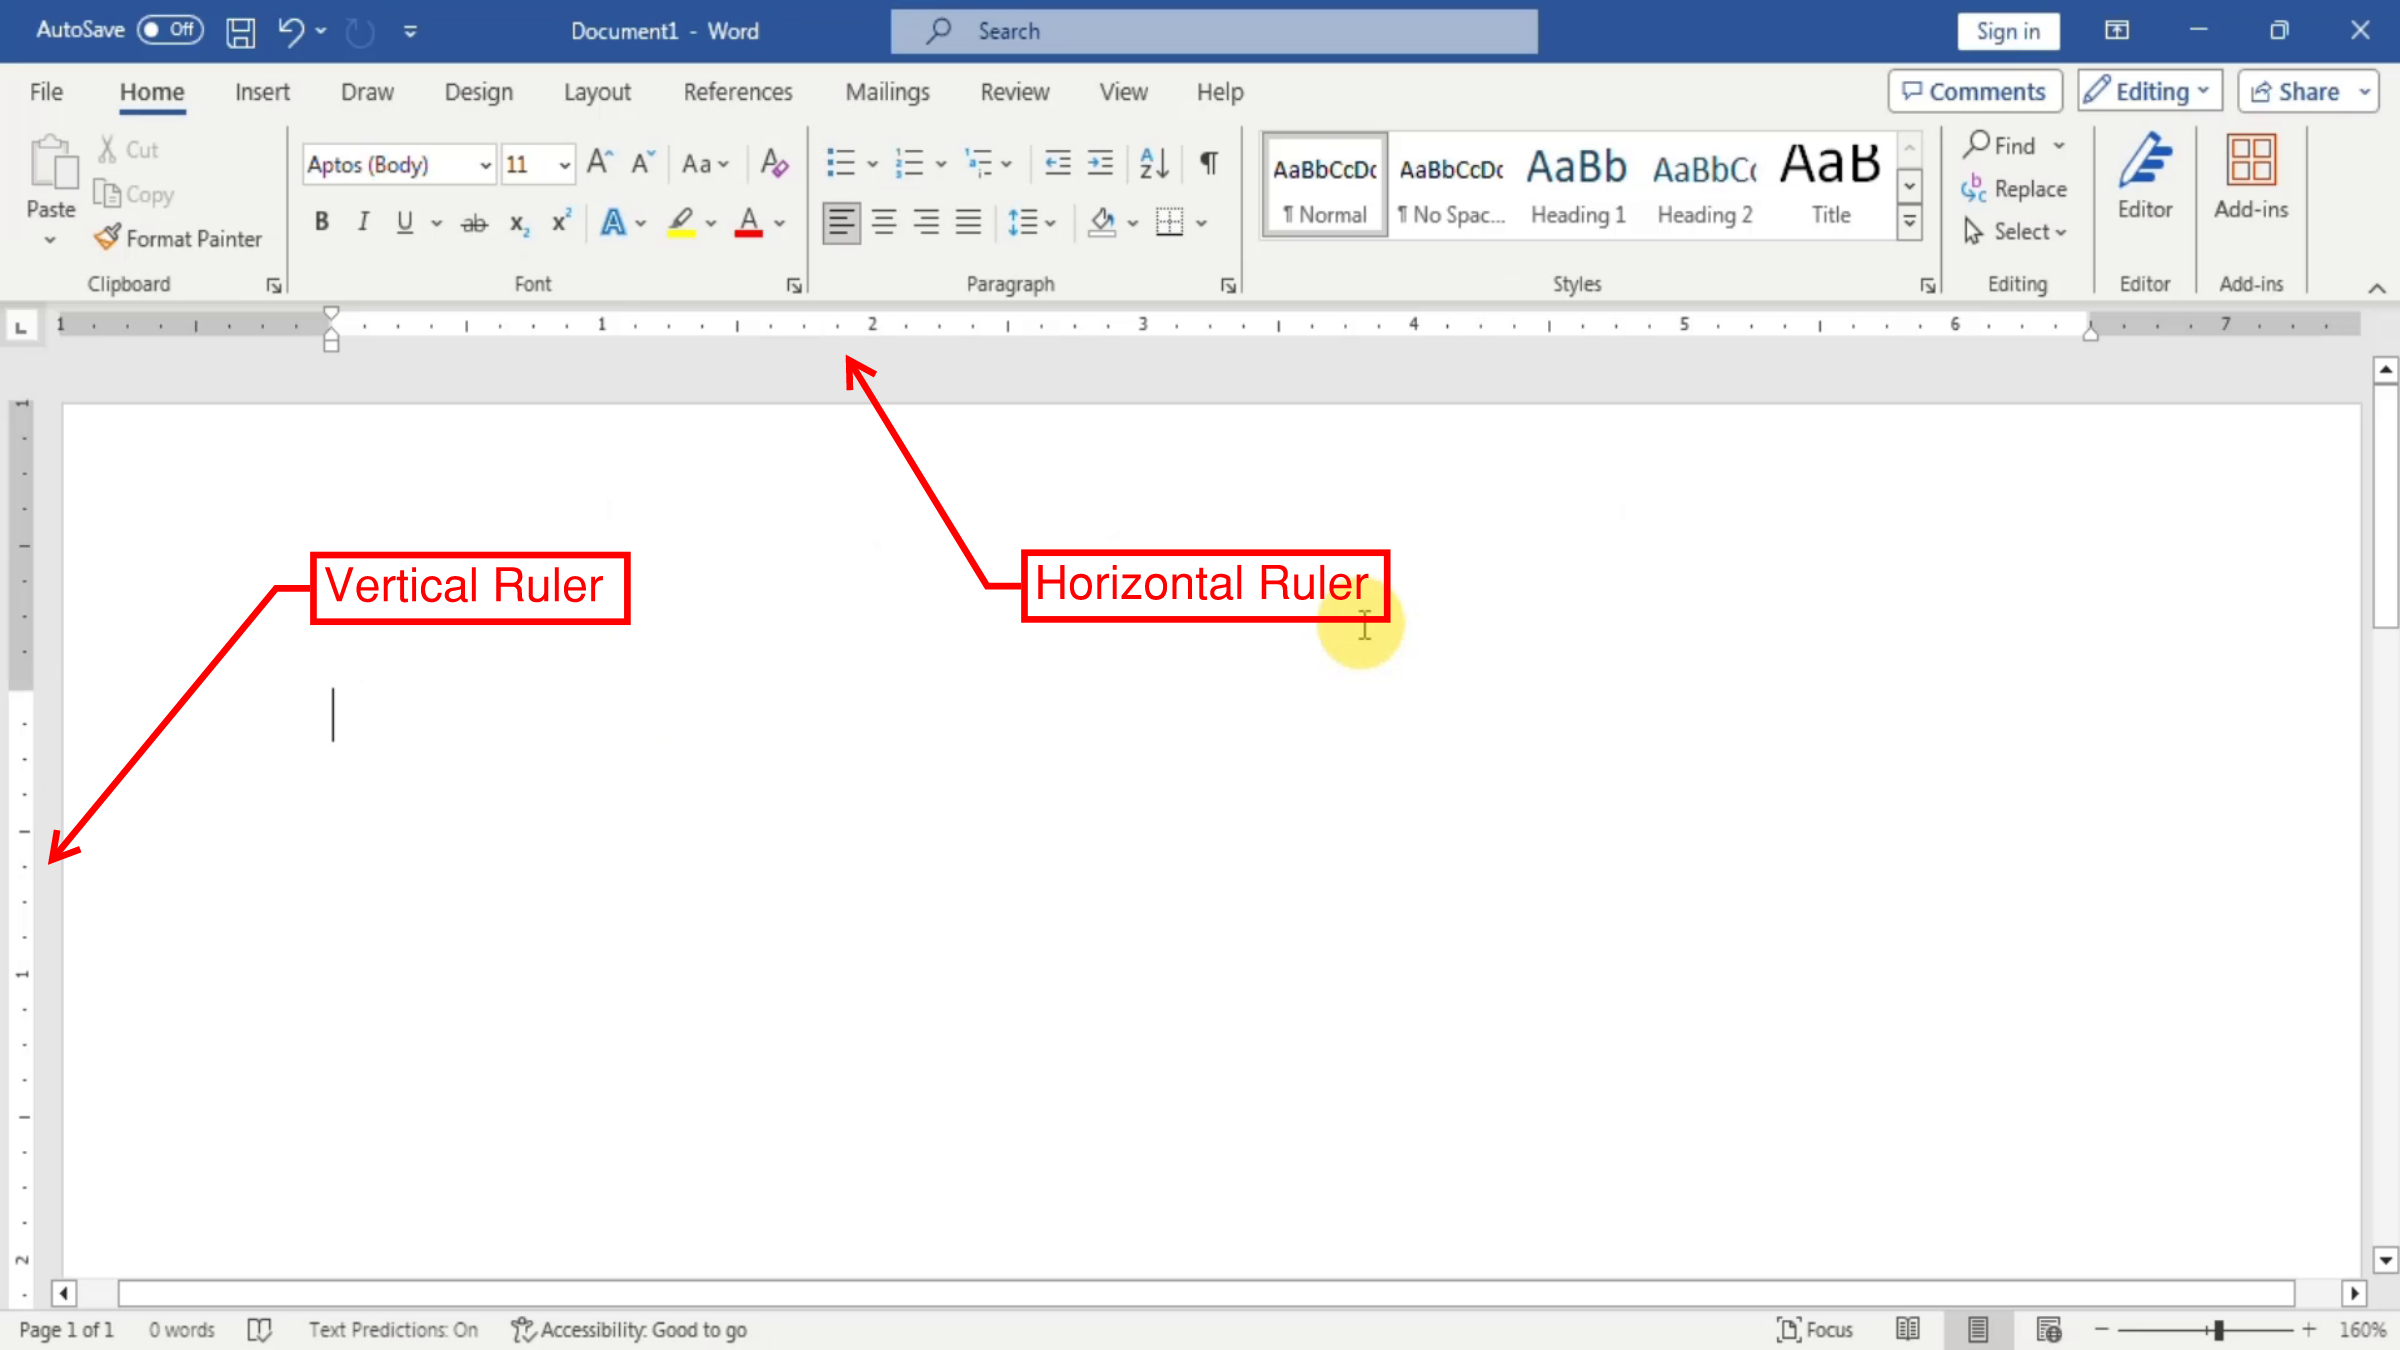 |
| The Ruler |
The Status Bar
At the bottom of the screen, we find the Status Bar. This provides us with helpful information about our document, such as the page number and word count. Right-click on the Status Bar to select which items we want to display, like the word count or page layout. Clicking on each of the items displayed opens its specific dialogue box.
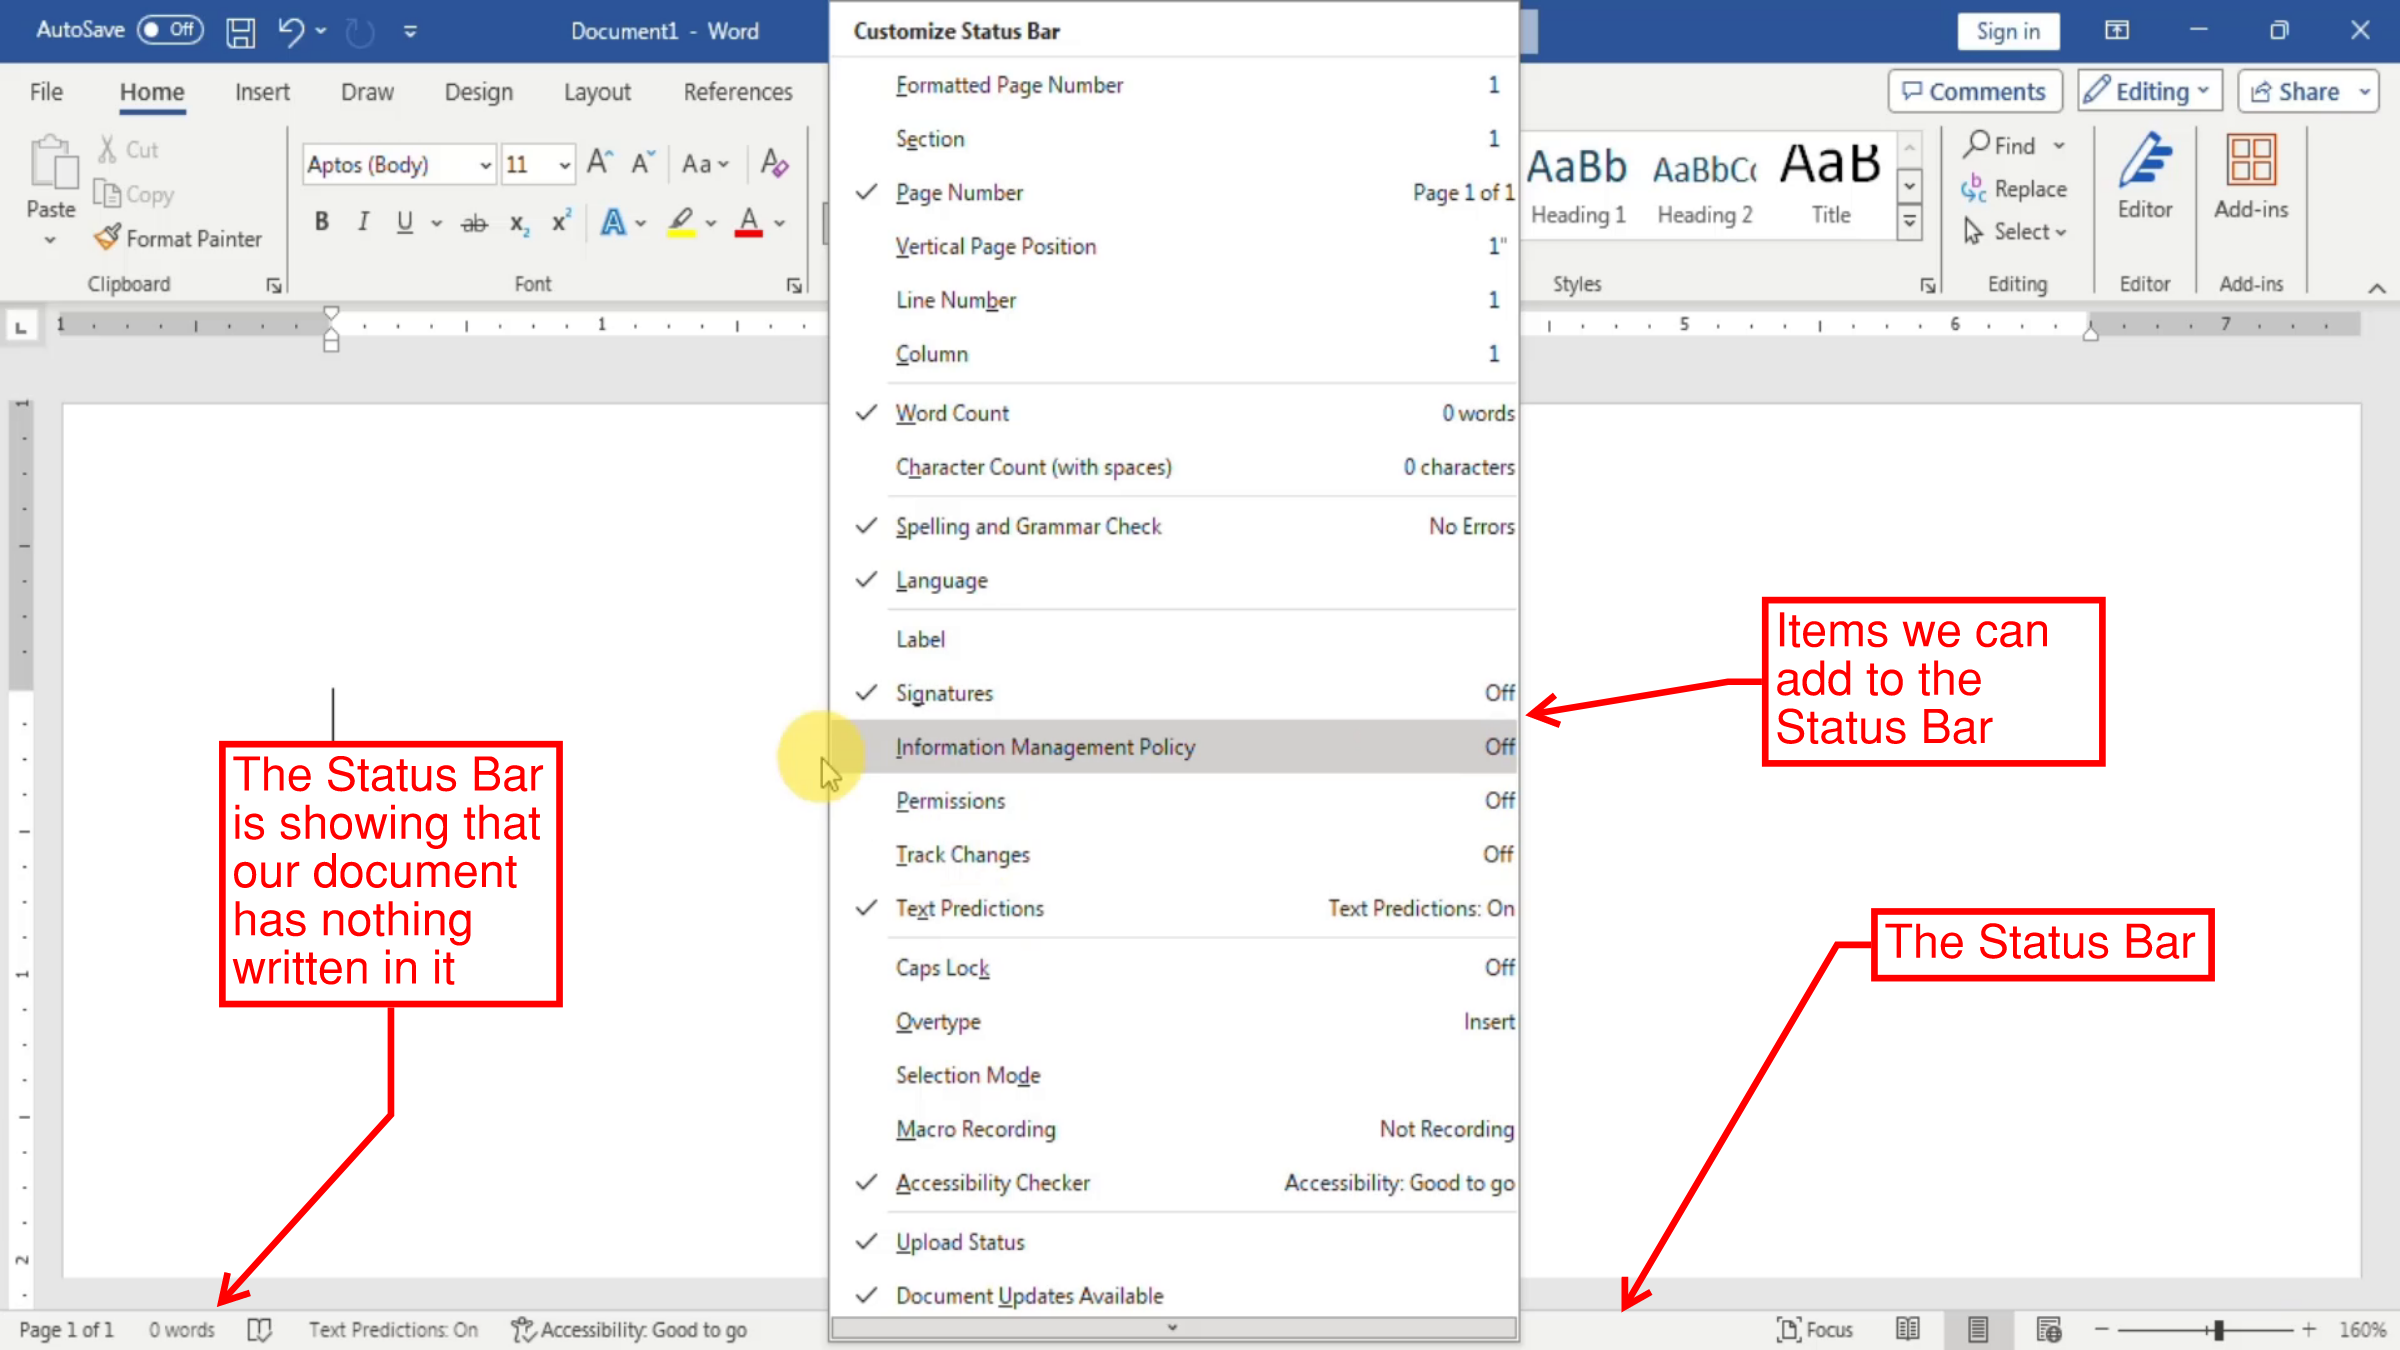 |
| The Status Bar |
On the right side of the
Status Bar, there are icons for four view options; however, most of the time, we will only need the
Print Layout view option to be selected. Next to these icons, we find the
Zoom control, which we can use to zoom in or out of our document by directly adjusting the position of the slider or by clicking the plus and minus sign icons.
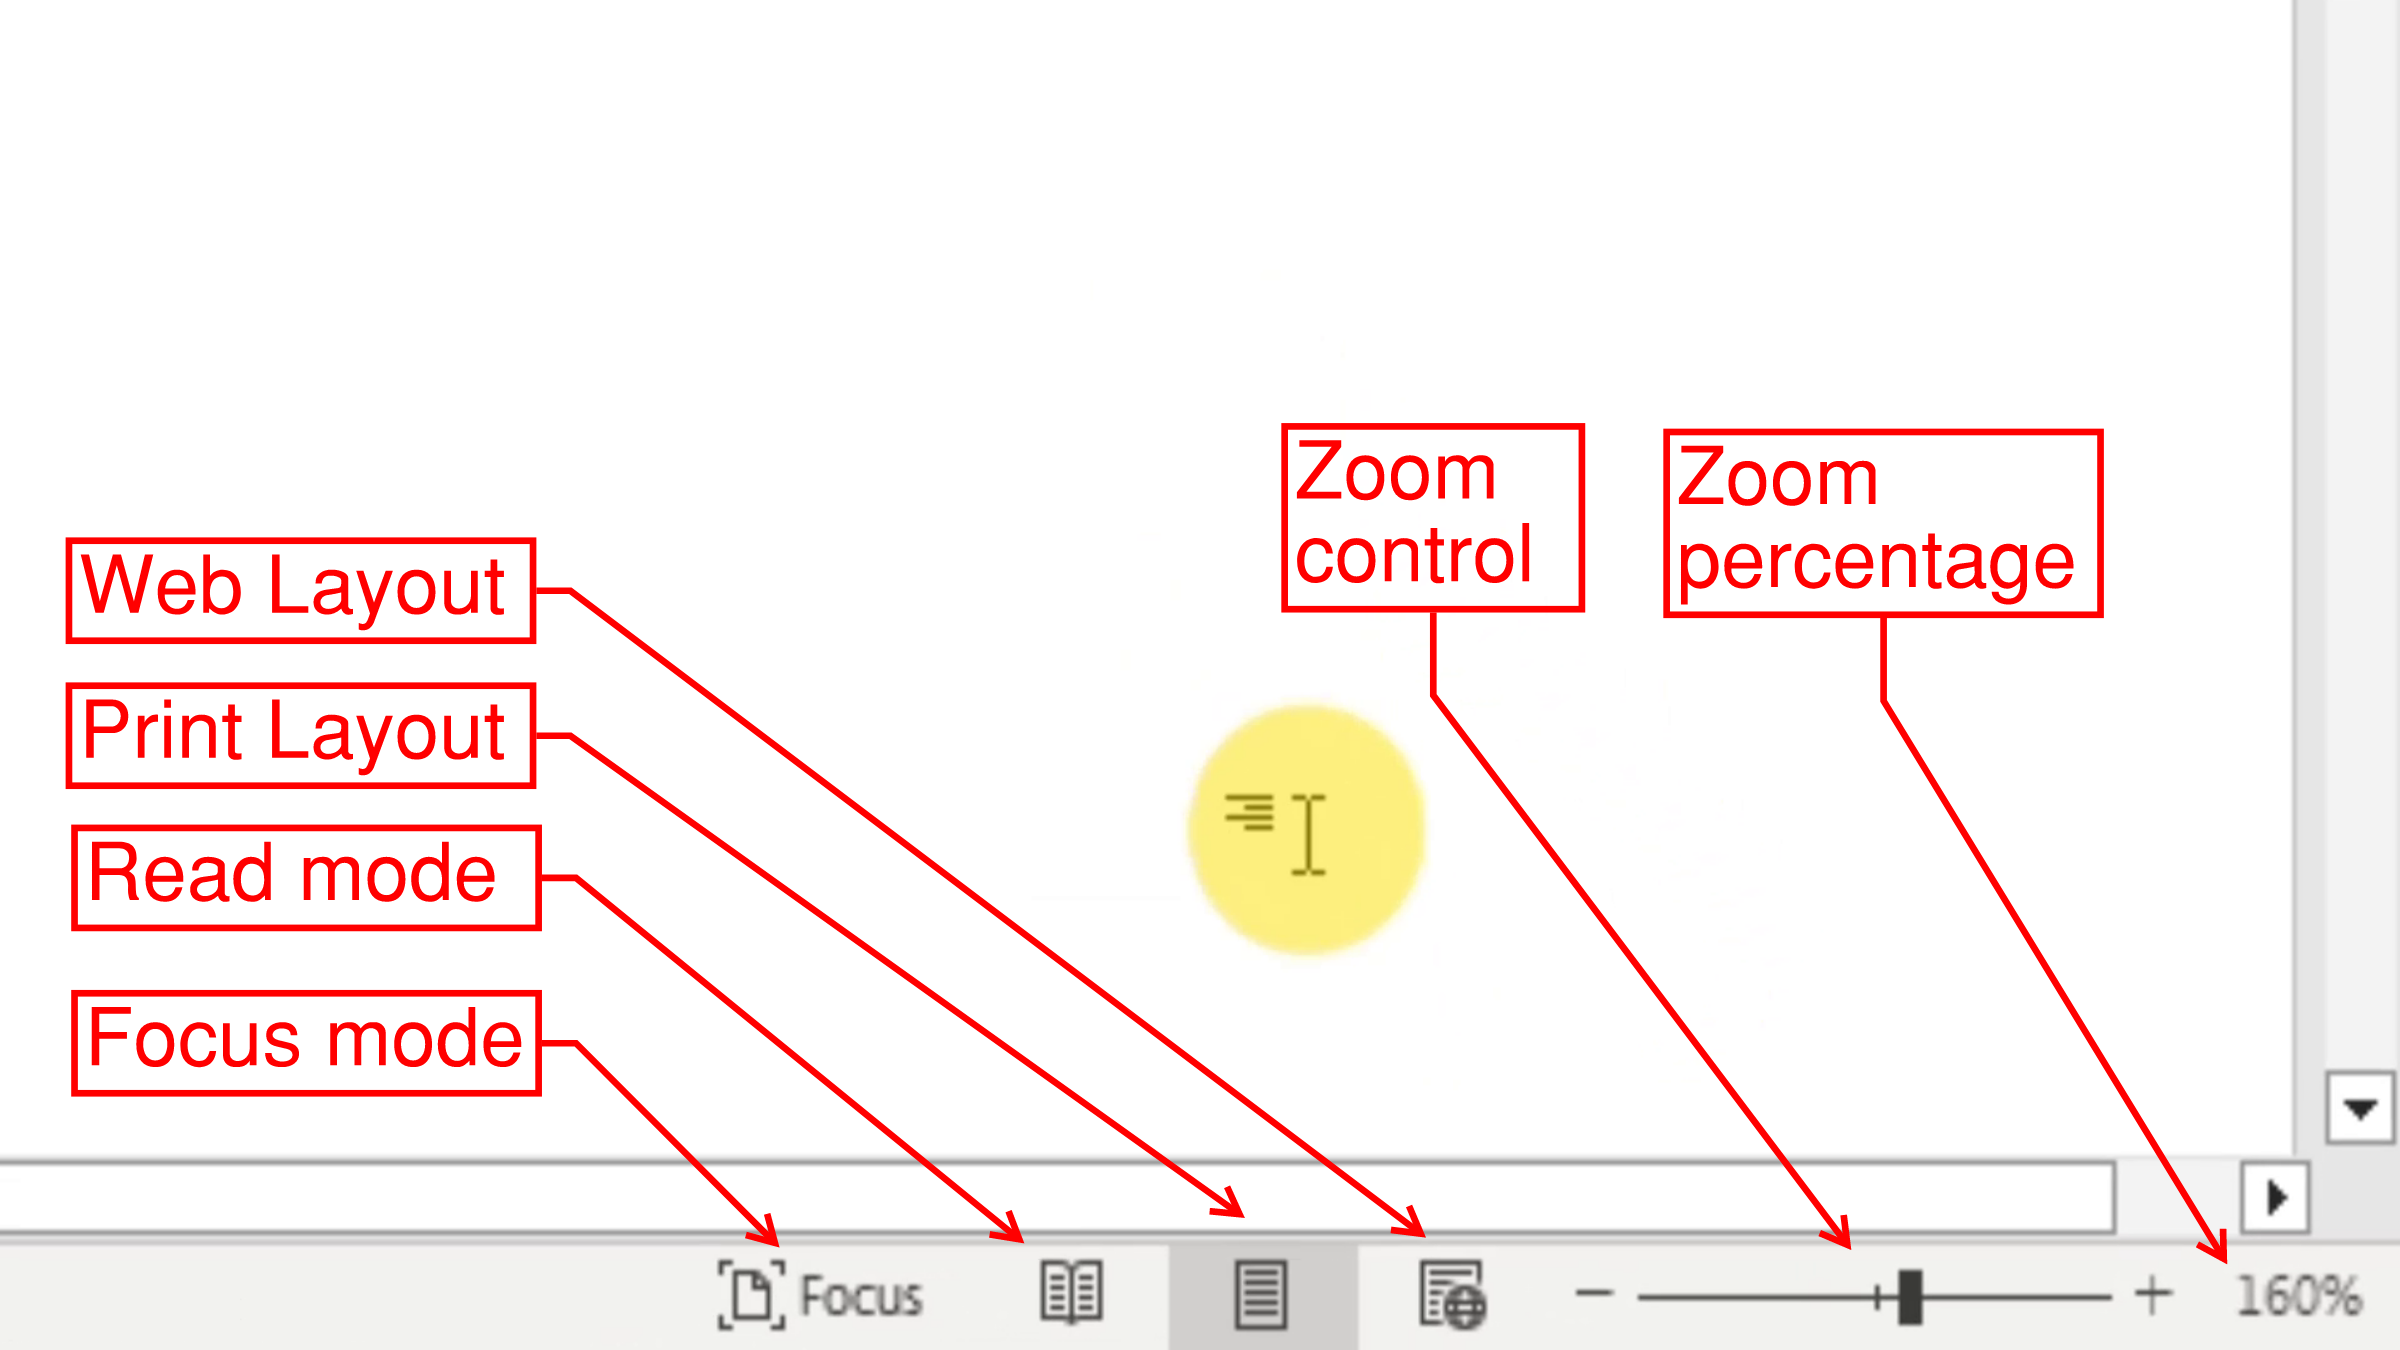 |
| View options and zoom control |
Conclusion
Navigating Microsoft Word’s interface may seem daunting at first, but once we become familiar with its key elements we'll be able to work more efficiently and take full advantage of Word’s powerful features. Don’t forget to explore other blog posts for more tutorials and insights
to help you make the most of Microsoft Word’s features. Until next
time!


